User Management – Importing Users by CSV (Sysadmin)
TABLE OF CONTENTS
Introduction
This article explains how to build a CSV file and use it to bulk import or update teachers, students, and parents/guardians in itslearning.
1 Overview
The CSV import feature enables the bulk creation or updating of multiple users within itslearning. User information is typically exported from a school management system and organised in Excel before being saved as a CSV file for import.
Note: Some functions described in this article may be disabled depending on country-specific or customer-specific requirements. In such cases, user management is carried out through a different method. Contact your system administrator if you are unsure which method applies to your site.
Note: For schools with a large number of users (500+), it is advisable to use an integration with the SIS/user management system to automate the creation of user accounts, rather than repeated manual CSV imports. Contact your itslearning account manager for more information about integrations.
2 Prerequisites
Prerequisite: The hierarchy structure you intend to import users into must be considered in advance. More information on setting up a hierarchy can be found in the Hierarchies article.
Prerequisite: The initial ("Start") hierarchy that users will be imported into must already exist. Sub-level hierarchies are created automatically during import if they do not yet exist.
3 Preparing the Import File
This section explains how to build an import file and prepare its content, using the structure of a CSV file as an example. The procedure below covers teachers and students. If you also intend to import parents or guardians, see Importing Parents and Guardians at the end of this article for additional considerations.
3.1 Building the CSV File
▶ What is a CSV file and how do I create one?
A CSV (Comma-Separated Values) file is a plain text file that stores tabular data, where each line represents one row and each value is separated by a comma. It can be created and edited in a spreadsheet application such as Excel or Google Sheets, or in a plain text editor.
To build the import file:
- Add one column header per field in the first row, for example Synchronisation Key, First Name, Last Name, Username.
- Enter one user per row, with the values in the same column order as the headers.
- Save the file with a .csv extension, encoded in UTF-8. In Excel, select File > Save As and choose CSV UTF-8 (Comma delimited) (*.csv) as the file type.
Note: The standard "CSV (Comma delimited)" option in Excel does not always save with UTF-8 encoding. This can cause accented or non-Latin characters (such as ü, é, or æ) to display incorrectly after import. Always select the CSV UTF-8 option specifically.
Note: If a value itself contains a comma, for example a name written as "Smith, John", enclose that value in double quotation marks so it is not read as two separate columns.
Before uploading, it is good practice to open the file in a plain text editor, such as Notepad, to confirm that values are separated by commas and that no unexpected characters have been introduced.
3.2 Preparing Data in Excel
To prepare the data in Excel, create a separate worksheet or file for each user group.
Important: Save each table as a separate CSV file (UTF-8, comma-separated). If the file size exceeds 550 MB, split it into smaller files.
3.3 Import File for Teachers
The following information is required to successfully import teacher data. The order of columns and their headings can vary, as they are mapped to the corresponding fields in itslearning before the import.
- Synchronisation Key (ID):Used for matching records when the import file is reused to update user data, for example at the start of a new school year. Each ID must be unique. If you have a user management system, source this ID from there. If not, generate a unique synchronisation key using the following format:
L_20200611_001- L = Teacher
- 20200611 = the current date in reverse (YYYYMMDD)
- 001 = a sequential number, which can restart at 001 each day
- In Excel, you can mark the first cell and drag it down the column to automatically generate all IDs.
- If you use itslearning across multiple schools on a shared platform, such as one provided by a school authority, include a school identifier in the ID, for example:
7389201_L_20200611_001
- First Name: The teacher's first name (or an abbreviation, if preferred).
- Last Name: The teacher's last name.
- Username: Must be unique. Common formats include "FirstName.LastName" or the teacher's initials. Umlauts are accepted and are recognised both with and without dots during login (for example, Müller = Muller). Consider a method for handling double names.
Note: itslearning can generate usernames automatically to prevent duplicates, which is especially useful across multiple schools on a shared platform. See 4.2 Map the Data Fields for the available options.
Automatically generated usernames typically consist of the initial letters of the first and last names, for example "MaSc" or "MarSch" for Maria Schneider.
Additional columns, such as a work email address, may also be included.
3.4 Import File for Students
- Synchronisation Key:If you already have a student number, for example from a management system, use it here. Otherwise, generate an ID following the same pattern as for teachers:
S_20200611_001- S = Student
- The remaining structure follows the same pattern as for teachers.
- First Name + Last Name: As for teachers.
- Username: As for teachers. If students are familiar with a student number, it can also be used as a username.
- Year + Class: These designations vary depending on the educational institution, for example training course and graduation year for vocational schools. There can be more or fewer than two columns. The aim is to map learners into a familiar structure so that, for example, a teacher can retrieve them as a group. These columns appear as sub-hierarchies of the student level after import.
4 The Import Process
4.1 Upload the Import File
Admin setting: Administration > User and Access Management > Import Users from File
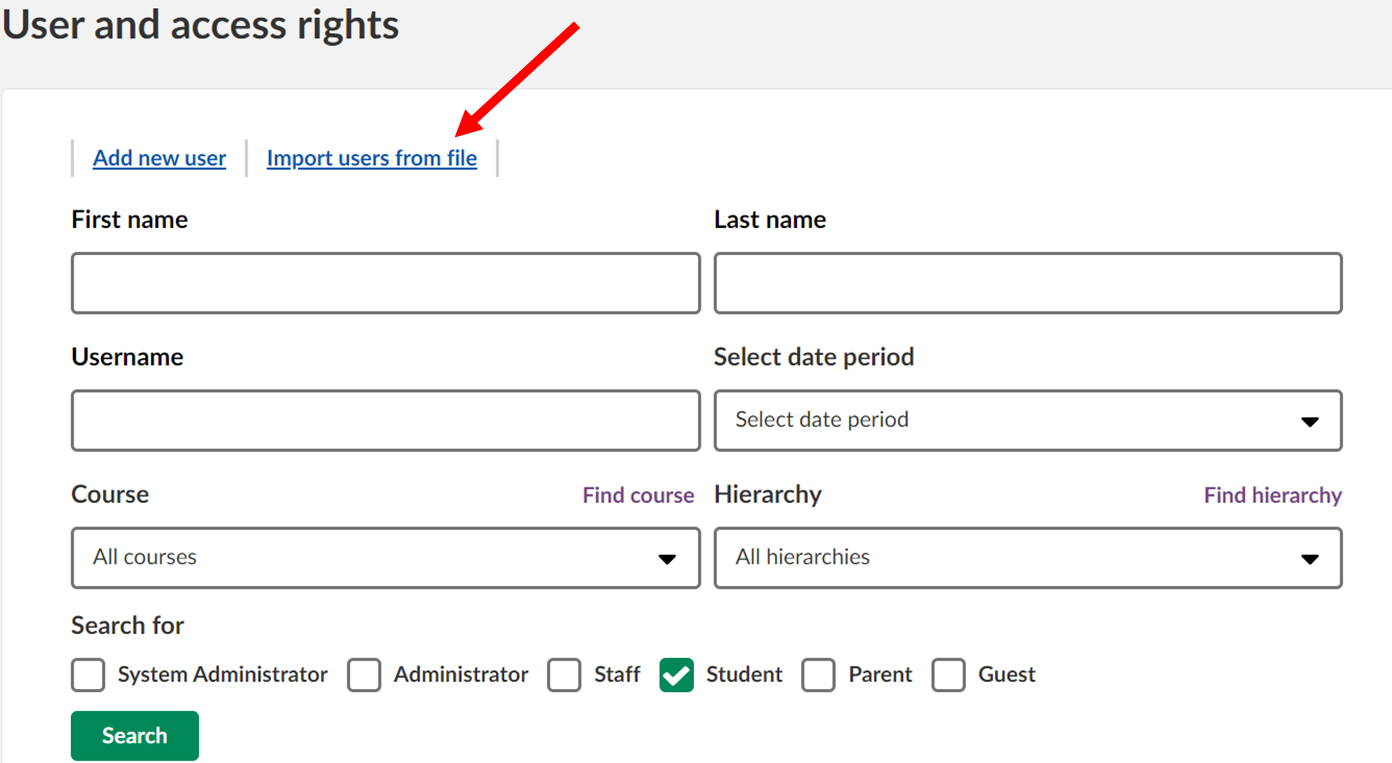
Follow the prompts to upload your prepared CSV import file. You can either search for the file on your computer or drag and drop it into the upload area. To correct an error or replace the file, click the file upload field and select a new file.
Once ready, click Next to proceed to mapping your data to the itslearning fields.

4.2 Map the Data Fields
Select the user profile, then match each CSV column to the corresponding itslearning field. Leave a field blank if it is not required and does not appear in your file, for example date of birth.
Note: itslearning automatically maps columns with headings that closely match its own field names. Always check the mappings before continuing.

4.2.1 Note about Usernames
itslearning can generate usernames automatically if they are missing or duplicated in your file. Choose one of the two options below when mapping the Username field.
| Goal | What to do |
|---|---|
| Generate all usernames automatically | Leave the field as "Generate (has not changed during synchronisation)" and check Allow username generation (if empty or used). |
| Use the usernames already in your file, and generate new ones only for duplicates | Map the Username field to your CSV column and check Allow username generation (if empty or used). |


Further down the form, map the ID column and select Synchronisation field for it.

If usernames are generated automatically, you can use the username itself as the synchronisation field, since itslearning guarantees all usernames are unique. If usernames are entered manually, add a separate ID column as the synchronisation field. This prevents existing accounts being accidentally overwritten.
Next, assign the hierarchy role and hierarchy for each user.

The start hierarchy must already exist. Sub-hierarchies are created automatically if they are missing, and students are placed into them during import. Teachers are not usually assigned to sub-hierarchies, so you can leave these fields blank.
Click Next when your mapping is ready.
4.3 Start the Import
A preview of your hierarchies is shown. Levels that are newly created during the import are marked "new".

Click Next again to see a preliminary report of the expected import. This gives an overview after a quick scan of the file for errors. If the number of errors in the initial scan is high, double-check that the file is correctly formatted. If there are only a few errors, you can proceed with the import. Once the import is complete, a detailed summary is presented with the numbers of the lines that contain errors.

Note: If "1" (one error) is displayed on the first line, this is usually because the first empty line of the import file contains an invisible control character. This error can be ignored.
Start the import process by clicking Finish.
4.4 View Import Summary
Once the import process starts, you are taken to the CSV import summary page, where you can see the status of the currently running import as well as import summaries from the past 14 days. If your import is large, you can leave the page and return later to check whether the process has completed.

Once the import has completed, you can view a detailed summary. If there were errors, the report references the type of error and the line number of the import file where it occurred, so you can make the necessary changes and run the import again.
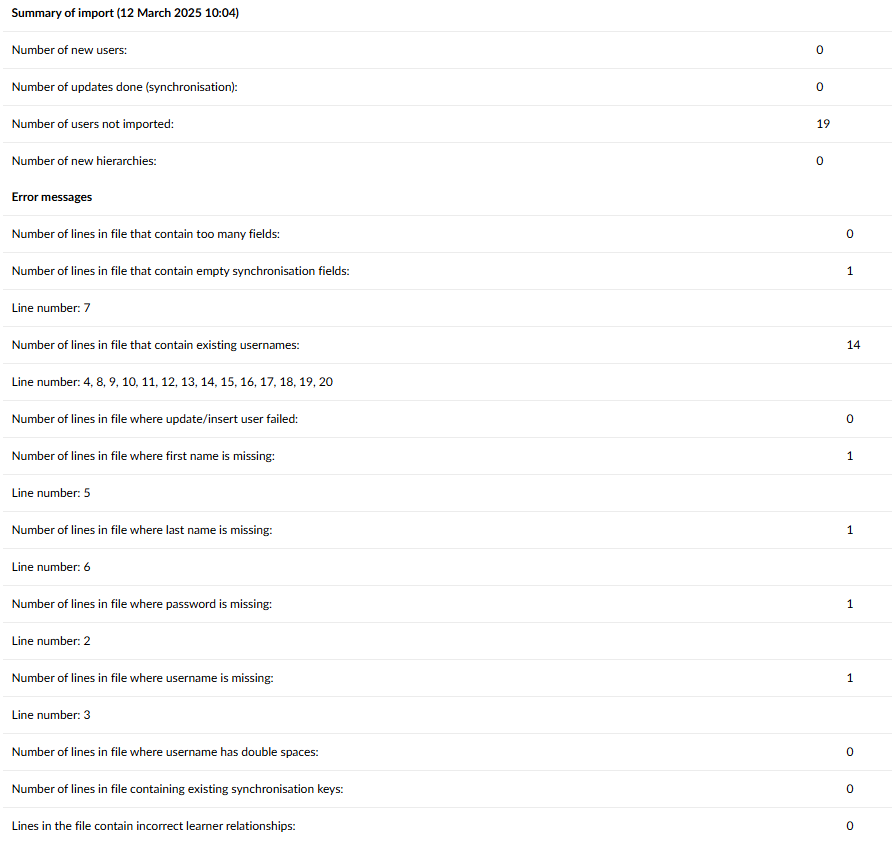
Important: A CSV import can only add or update users, not delete them. Deletion is carried out separately, in user management under "Users and Access Rights".
5 Importing Parents and Guardians
Prerequisite: Students must be imported before parents and guardians.
The import file for parents and guardians follows the same logic as for teachers, with one important exception: it must also include a unique identifier of the child connected to them. Without this, it is not possible to automatically connect a parent or guardian to a child.
Two fields at the bottom of the field mapping form are used to connect a parent or guardian with a child.

5.1 Synchronisation Field in Import File
This setting tells itslearning which field to use when connecting parents or guardians to their children. The alternatives in the drop-down list are retrieved from the CSV file being imported. In the example shown above, the synchronisation field would be studentSyncKey.
5.2 Matching Synchronisation Field for Child
This field must match the selection made for Synchronisation Field in Import File above, and tells itslearning what kind of field that value represents. You can select from three alternatives: Internal person ID, Synchronisation key, and Username.
- If the synchronisation field in the import file contains usernames, select Username as the matching synchronisation field.
- If your CSV file has a SyncID field, select Synchronisation key.
More Help Resources
Have more questions? Please start with asking your school administrator.
Product Release notes
Stay updated with itslearning latest releases: https://itslearning.com/product-updates
Service Status
Check the current status of itslearning services: https://status.itslearning.com/
Ideas Portal
Share your ideas and help shape the future of itslearning: https://ideas.itslearning.com/
Roadmap
Check out our roadmap: https://itslearning.com/global/roadmap/