Course settings - Overview (Teacher)
TABLE OF CONTENTS
- 1 Overview
- 2 Course properties and features
- 3 Plans
- 4 Share as template
- 5 Course catalogue
- 6 Learning objectives
- 7 Assessment settings
- 8 Course export
- 9 Deleting a course
- 10 Troubleshooting
1 Overview
Course settings allow teachers to configure properties, features, plans, learning objectives, assessment scales, and sharing options for a course. The settings page is divided into several sections, each covering a specific area of course configuration.
To deeper insights on different topics, look for their respective articles.
Note: Not all settings and features described in this article may be available in your course. The availability of specific features depends on site-level configuration set by your system administrator.
1.1 Accessing course settings
- Open the course you want to configure.
- Click the three-dot menu (...) in the course submenu.
- Select Settings.

The Settings page displays the available configuration options, organised into the Manage course settings section and the Apps section.

2 Course properties and features
The Course properties and features page contains two tabs: General and Description.
2.1 General tab
The General tab contains the following settings:
Description
| Setting | Description |
|---|---|
| Title | The official title of the course. Course titles created through integration usually cannot be changed. |
| Friendly name | A short, descriptive name to make the course easy to find in lists and overviews. |
| Image | The course image displayed on the course card. |
| Colour | The colour that distinguishes the course from others. |

Course code and hours
| Setting | Description |
|---|---|
| Course code | A curriculum or organisation code that makes the course easier to find in the course catalogues. Usually managed through integrations and imported from your SIS. |
| Hours | The total number of class hours needed to complete the course. If you do not use integrations, you can enter the correct hours here to ensure accurate absence percentages. |
| Organisation | Selecting an organisation helps structure courses within a site. |
Course terms
Terms are divisions of the school year in which grades are organised (also called semesters, quarters, or trimesters). Your itslearning administrator creates terms for your organisation.
If no terms are listed, select Add term, choose the appropriate terms, and click Add. If no terms are available to select, contact your itslearning administrator.

Course focus
Select the format and focus for the course. You can change the course focus at any time without losing content or student data. The available course focus options are:
| Course focus | Description |
|---|---|
| Subject | Standard course layout. |
| Class course | Designed with a simpler and more visual interface. |
| Self-paced learning | Designed for students to work at their own speed. |
| Information Hub | A non-academic course type for distributing information and resources to students, teachers, or guests, for example a staff room, a course for all parents in a class, or a course for the entire student body at a school. Information Hub courses do not display plans or task lists, and Plans and Reports are not available in the course menu. This course type is managed by teachers and administrators, and can serve as a replacement for the hierarchy dashboard. |
The selected course focus determines which settings pages, course menu items, course page components, and plan types are available. See 2.4 Course focus and course type differences for details.

Functions
The Functions section allows you to enable or disable specific features within the course. The list below applies to Subject and Class courses. Self-paced learning and Information Hub courses show a reduced set of functions, see 2.4 Course focus and course type differences.
| Function | Description |
|---|---|
| Links | Place course-related links in the Links option of the course menu. |
| Participants | Allow course participants to see all participants in the course. |
| Reports | Allow participants to access reports. |
| Assessment record | Activate the assessment record function. The global administration setting for the assessment record must also be enabled. |
| Progress report | Enable progress reports for users. |
| Files in course | Include documents created in other applications. |
| Portfolio assessment | Allow participants to create a portfolio from course work. |
| Learning objectives | Enable learning objectives and mastery tracking. |
| Plans | Enable plans within the course. |
| Notifications when students are added to the course | Send notifications when students are added to the course. This is relevant for courses that use the course catalogue for registration. |
| Teachers can only see and manage events for course groups they are a member of | Restrict event management to teachers' own course groups. |
| Create Microsoft Team for course | Create a linked Microsoft Teams team (dependent on site setup). |
| Assignment labels | Apply a predefined label to student work. Labels are configured at site level by a system administrator, who can define up to five labels, for example "AI Assessment Scale (AIAS)". This function appears only if assignment labels have been enabled and configured at the site level. |

Choose start page
Determines the first page users see when opening the course.

360° reports
The 360° reports allow teachers to compare the progress of all students in the course. This section controls the 360° report settings for the individual course.
Available options:
| Report | For teachers | For students |
|---|---|---|
| Activity report | View 360° activity report | Show 360° activity report to students |
| Progress report | View 360° progress report | Show 360° progress report to students |
| Grades report | View 360° grades report | Show 360° grades report to students |

Permissions
| Permission | Description |
|---|---|
| Allow withdrawal | Allows participants to withdraw from the course manually. |
| Allow AICC communication | Enables cross-site course sharing using the AICC HACP protocol. When activated, an AICC URL is generated that can be shared with a partner school or site. AICC communication must be activated on both the sharing and receiving sites. |
Remember to click Save to apply any changes made on the General tab.

2.2 Description tab
The Description tab contains information visible to students when they view course properties, as well as in the course catalogues if the course is shared.
| Field | Description |
|---|---|
| Content | Describe what the course contains. |
| Objective | Explain what participants should be able to do after completing the course. |
| Organisation level | Define the age or class level that fits the course. |
| Evaluation | Specify assessment methods and grading scales. |

2.3 Additional actions (three-dot menu)
On the Course properties and features page, click the three-dot menu (...) in the upper right corner to access:
| Action | Description |
|---|---|
| Apply template | Apply a course template to the current course. |
| Use as template | Use the current course as a template. |
| Move to archive | Archive the course. |
| Delete | Delete the course permanently. |

2.4 Course focus and course type differences
The course focus selected on the General tab (see 2.1) determines which settings pages, course menu items, course page components, and plan types are available for the course. The tables below summarise these differences for each course focus.
▶ Functions by course focus
| Course focus | Functions shown |
|---|---|
| Subject | Full list, see Functions in 2.1 |
| Class | Full list, see Functions in 2.1 |
| Self-paced learning | Assignment labels |
| Information Hub | None |
▶ Settings pages by course focus
| Settings page | Subject | Self-paced learning | Class | Information Hub |
|---|---|---|---|---|
| Course properties and features | ✓ | ✓ | ✓ | ✓ |
| Plans | ✓ | ✓ | ✓ | ✗ |
| Learning objectives | ✓ | ✓ | ✓ | ✗ |
| Files | ✓ | ✓ | ✓ | ✗ |
| Assessment settings | ✓ | ✓ | ✓ | ✗ |
| Submission statuses | ✓ | ✓ | ✓ | ✗ |
| Share as template | ✓ | ✓ | ✓ | ✓ |
| Course catalogue | ✓ | ✓ | ✓ | ✓ |
Note: Submission statuses is not covered elsewhere in this article. [VERIFY]
▶ Course menu and course page by course focus
Course menu items
| Subject | Self-paced learning | Class | Information Hub | |
|---|---|---|---|---|
| For teachers | Overview, Plans, Resources, Reports, Participants, (Apps) | Plans, Resources, Reports, Participants | Overview, Plans, Resources, Reports, Participants, Apps | Overview, Resources, Participants |
| For students | Overview, Plans, Resources, Reports, Participants, (Apps) | Plans | Overview, Reports, Participants, Apps | Overview, Resources, Participants |
Note: Items shown in brackets, such as (Apps), may be conditional, for example only visible if at least one app is enabled for the course. [VERIFY]
Note: For Class courses, the course menu can be hidden from students. [VERIFY]
Course page components
| Subject | Self-paced learning | Class | Information Hub |
|---|---|---|---|
| Plans, Task list, Announcements, Events, Latest changes, (Course info block) | Plans, Course info block | Course card, Topics, Announcements | Course info block, Announcements, Latest changes |
For Information Hub courses, the course info block displays a course description created with a rich text editor, which supports headings, text styling, and hyperlinks. If a course image is set, it is shown in the course info block. If no image is set, an illustration based on the course colour is shown instead. The course image can be set when creating the course, by editing the course card, or through course properties and features.
▶ Plan types by course focus
| Plan type | Subject | Self-paced learning | Class | Information Hub |
|---|---|---|---|---|
| Deadline-driven | ✓ (default) | ✗ | ✗ | Not applicable |
| Self-paced: one plan at a time | ✓ | ✓ | ✗ | Not applicable |
| Self-paced: all plans at once | ✓ | ✓ (default) | ✓ | Not applicable |
Note: Information Hub courses do not use plans, see Course focus in 2.1.
For Class courses, an additional Topic presentation setting is available on the Course properties and features page, with Show resources and Show plans options.
3 Plans
The Plans settings page allows you to configure plan settings for the individual course.
3.1 Plan type
| Plan type | Description |
|---|---|
| Deadline driven | Use dates to schedule when students see the plans. Only the current plan appears in the students' course overview. |
| Self-paced | Students work at their own speed. Plans have no time restrictions. |
The plan types available, and the default plan type, depend on the course focus selected for the course. See 2.4 Course focus and course type differences for details.

3.2 Topics
Topics allow you to group plans and describe what students will work on. You can choose whether to create a folder for each new topic, which affects the resource structure.


3.3 Resources and activities
Choose between one combined field or separate fields for resources and activities.
3.4 Visibility
Configure when plans become visible to students. Options include making plans visible manually or automatically. You can also set the default status for new plans (Visible or Not visible) and choose whether connected elements become automatically visible when a plan is made visible.
3.5 Anonymous access
Provides a link to the plan that can be published externally, for example on the school's website. Enable anonymous access by ticking the checkbox.
3.6 Topic fields and plan fields
Configure the fields visible in topics and plans, including their visibility settings (Everyone, Teacher, Nobody) and whether they appear in the calendar.
Default plan fields include: Title, Date, Class hours, Description, Learning objectives, Resources, and Activities. You can add custom fields using the Add field option.


4 Share as template
Sharing a course as a template allows other users to create a new course based on it. All elements within the template are copied to the new course, including course settings, plans, and other elements.
Share with:
| Option | Description |
|---|---|
| Do not share | The course is not shared as a template. |
| Your school | The template is available to users within your school. |
| Your site | The template is available to all users on your site. |
Additional options (when sharing is enabled):
| Option | Description |
|---|---|
| Add content to Library | Makes the resources in the course available through the itslearning Library. The school administrator can configure the Library to share locally or site-wide. |
| Add course teachers as co-author | By default, only the teacher who adds resources to the Library can edit them. With this option enabled, any teacher in the course retains the ability to edit the resource after it has been added to the Library. |
5 Course catalogue
The course catalogue setting controls whether the course is available in the school course catalogue and how students can access it.
When set to None, all students must be entered into the course either manually or through an integration.
When the course catalogue is enabled, you can define:
Registration:
| Option | Description |
|---|---|
| Approval | Students can apply for access to the course. |
| Registration key | A key is required to register for the course. |
| Freely | Students can register themselves without approval. |
Maximum number of free seats: Set the maximum number of available places in the course.
6 Learning objectives
The Learning objectives settings page allows you to insert, create, and manage learning objectives for the course.
6.1 Insert learning objectives
To track standards mastery and progress, align your course to learning objectives from a repository.
- Navigate to Settings > Learning objectives.
- Click Find.
- Navigate to the appropriate repository.
- Select the appropriate standards for your course.
- Click Insert or Insert and close.
The selected learning objectives are now available to attach to plans or course elements.
Note: If standards are missing from the repository, contact your system administrator.
6.2 Create learning objectives
Teachers can create their own learning objectives to track within a course.
- Navigate to Settings > Learning objectives.
- Click Create.
- Enter the learning objective details.
Note: Learning objectives created within a course cannot be shared with others unless the course is shared as a template. An itslearning administrator can also import learning objectives from an XML or XLSX format.
6.3 Assessment settings for learning objectives
You can track each student's progress with individual learning objectives by configuring achievement levels.
- Navigate to Settings > Learning objectives.
- Click Assessment settings in the upper right area of the page.
Available settings:
| Setting | Description |
|---|---|
| Number of levels | Select the number of achievement levels. |
| Achievement level labels | Define labels for each level (lowest level at the top). |
| Calculate overall assessment in view of the criteria-based assessment | When enabled, a mark from the assessment scale is suggested based on the criteria-based assessment. |
| Show outcome status for students | When enabled, achievement levels are visible to students in each assessment. |
Note: Achievement levels can also be configured at the site level by a system administrator.
7 Assessment settings
The Assessment settings page contains three tabs: Assessment scale, Categories, and Assessment record settings.
7.1 Assessment scale
The assessment scale should align with your school's grading policies and is set up by your itslearning administrator. Course teachers cannot change or delete administrator-created assessment scales, but can create and delete their own scales.
To view details for a specific assessment scale, click on its title.
7.2 Creating a custom assessment scale
- Navigate to Settings > Assessment settings > Assessment scale tab.
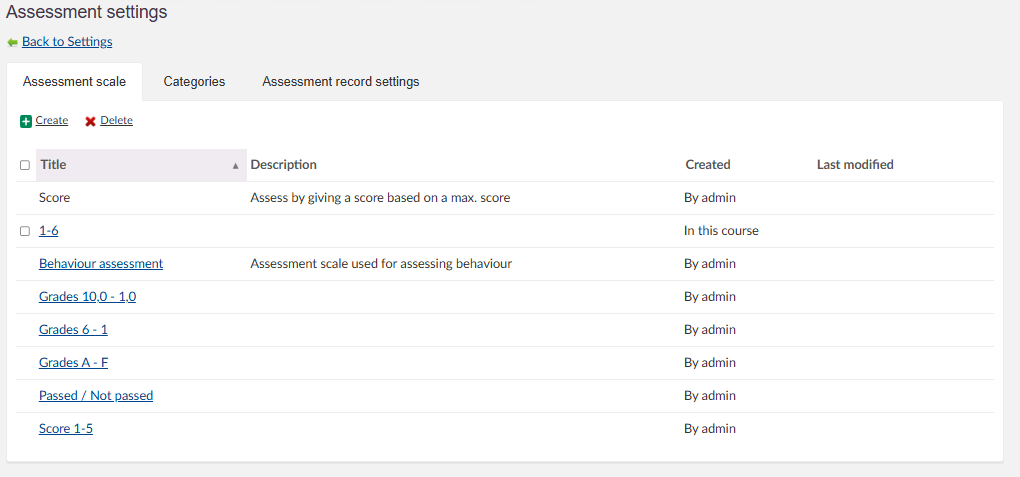
- Click Create.
- Fill in the required fields:
Field Description Title The name of the new scale. Totals How the total is displayed in the assessment record. Description A description of what the scale is for. Calculate percentages Automatically divides the number of rows by 100 to determine percentage thresholds. If unchecked, you can define your own thresholds. Percentages can be changed when used with tests Allows you to adjust percentage thresholds for individual tests. Assessment rows Enter grades in descending order (highest/best first). - Click Save.
Note: A custom assessment scale is only available in the course where it was created. To use it across multiple courses or school-wide, contact your administrator.
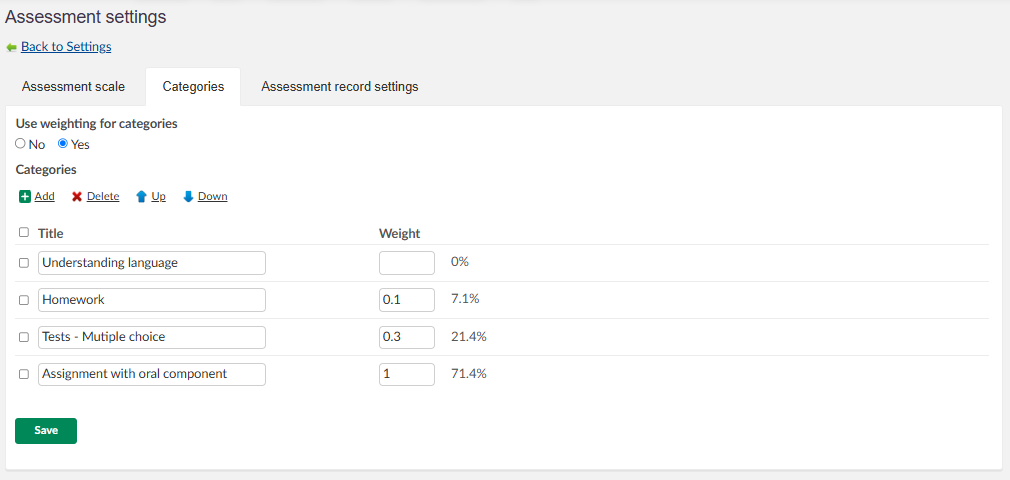
7.3 Categories
The Categories tab allows the teacher to set up categories for assignments. These can be bothe for themes within a course or assignment types such as homework, tests, quizzes. These categories can be weighted. If weighting is not enabled, all categories are weighted evenly.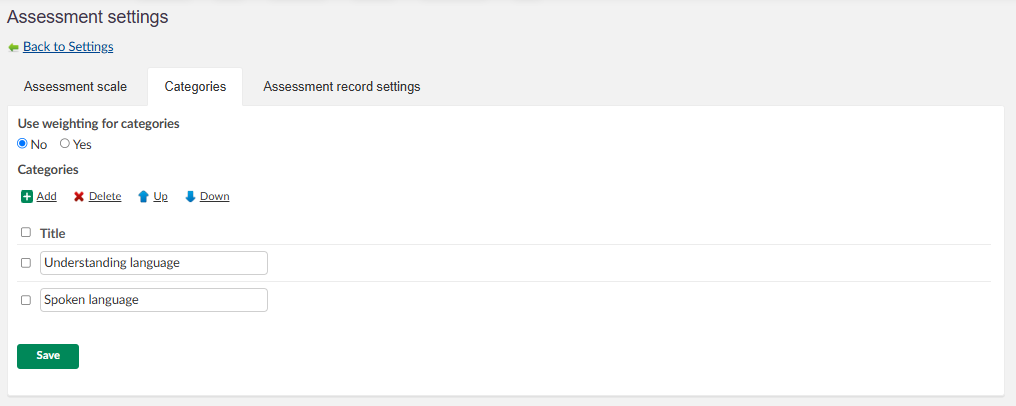
7.4 Assessment record settings
Note: This page edits the settings for the assessment record found under Status and follow-up, not the course settings directly. These settings can also be accessed from there.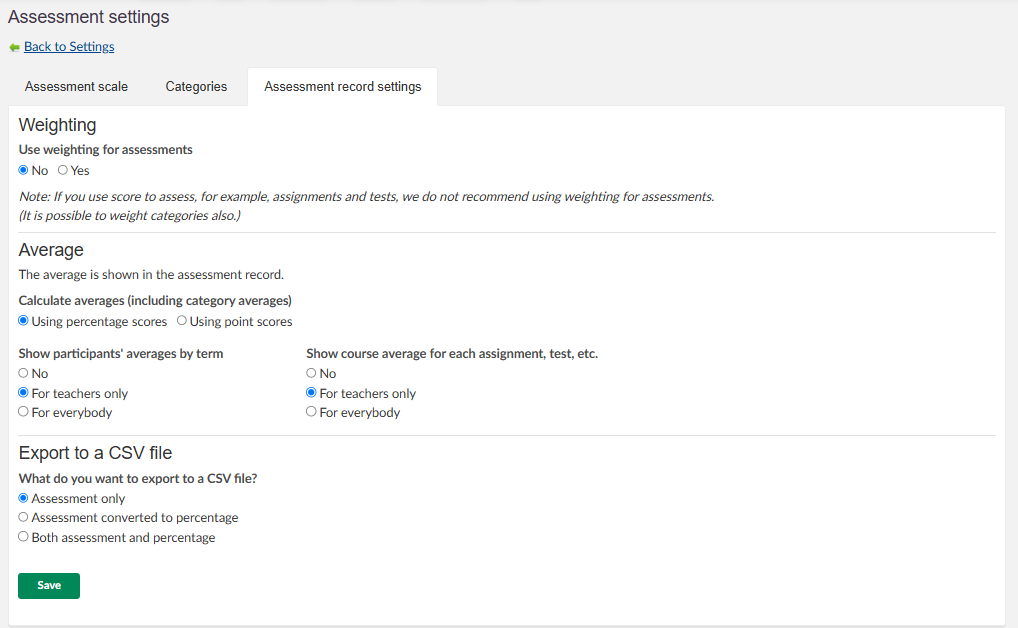
Use weighting for assessments: Enable or disable weighting for individual assessments.
Average:
| Setting | Description |
|---|---|
| Calculate averages | Choose between percentage scores or point scores. |
| Show participants' averages by term | Options: No, For teachers only, For everybody. |
| Show course average for each assessment | Options: No, For teachers only, For everybody. |
When average for participants is enabled, an additional Average and count tab becomes visible in the assessment record.
Export to a CSV file: Assessment only, Assessment converted to percentage, or both assessment and percentage.
7.5 Weighting
When assessment weighting is enabled, you can enter a numerical weight for individual assignments, tests, or tasks. Without weighting, all assessments are calculated as a percentage (100%). Weighting allows you to increase the value of individual assessments: for example, one assignment might count twice while another counts three times towards an average. Final assessments cannot be weighted.
In the assessment record overview, the assessment weight can be viewed by hovering over the element header.
8 Course export
The course export function allows you to export course resources in one of two formats:
| Format | Exports |
|---|---|
| IMSCC 1.1 | Folders, files, links, notes, pages, and discussions. |
| Moodle 4.1 | Folders, files, links, notes, pages, discussions, tests, assignments, tasks, and surveys. |
- Navigate to Settings and select Course export under the Apps section.
- Select the desired export format from the dropdown.
- Click Start export.
9 Deleting a course
- Open the course and navigate to Settings.
- Select Course properties and features.
- Click the three-dot menu (...) in the upper right corner.
- Select Delete.
- Confirm the deletion by clicking Delete on the confirmation page.
10 Troubleshooting
Cannot see certain settings or features
Symptoms: Some settings or features described in this article are not visible in your course.
Cause: Feature availability depends on site-level configuration managed by your system administrator.
Solution:
- Verify that the feature is enabled in the Functions section of Course properties and features.
- Contact your system administrator to check whether the feature is enabled at the site level.
Cannot change the course title
Symptoms: The course title field is not editable.
Cause: Course titles created through integration (SIS) usually cannot be changed within itslearning.
Solution:
- Contact your system administrator to update the course title through your SIS.
No terms available when adding course terms
Symptoms: No terms appear when selecting Add term.
Cause: Terms are created by the itslearning administrator for the organisation.
Solution:
- Contact your itslearning administrator to set up terms for your organisation.