Using custom labels for assignments - teacher guide
TABLE OF CONTENTS
- 1 Overview & Introduction
- 2 Prerequisites & Requirements
- 3 Getting Started
- 4 Core Features & Functions
- 5 Step-by-Step Workflows
- 6 Settings & Customization
1 Overview & Introduction
Custom labels allow you to provide students with clear, additional information about assignment requirements directly within the assignment itself. Labels created by your site administrator might indicate whether AI tools can be used, whether collaboration is required, or whether the task will be presented later. These labels appear prominently at the top of assignments, helping students better understand expectations and prepare accordingly. You must enable Assignment labels in your course settings before you can apply them to assignments.
2 Prerequisites & Requirements
Before using custom labels, ensure:
- Your site administrator has activated the Assignment labels feature and created at least one label
- You have teacher permissions in the course where you want to use labels
- You have enabled Assignment labels in your course settings
3 Getting Started
3.1 Enabling Assignment Labels in Your Course
Before you can apply custom labels to assignments, you must enable the feature in your course:
- Select your course
- Click on Settings (ellipsis/three dots in the upper-right corner)
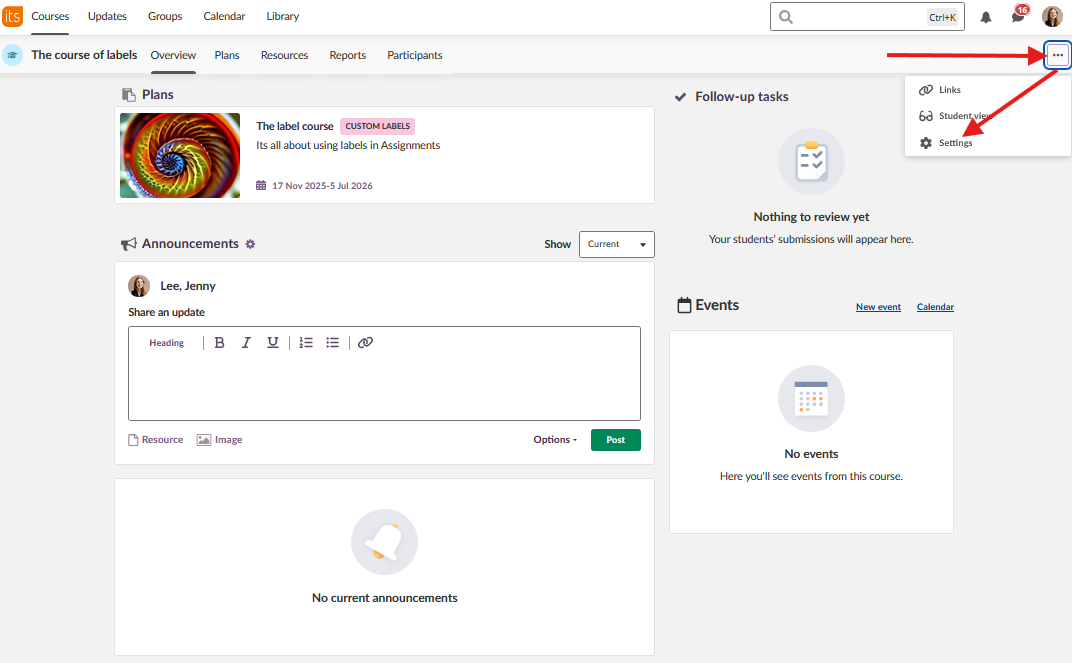
- Open Course properties and features
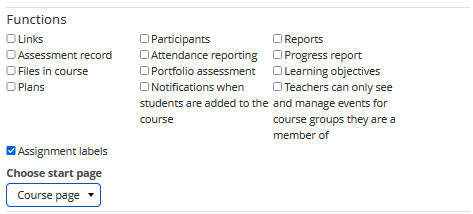
- Scroll down to Functions
- Locate Assignment labels and check the box to activate it
- Save your changes
Once enabled, you can apply labels to both new and existing assignments in your course.
3.2 Understanding Available Labels
Your site administrator has created the labels available to you. Each label includes a name, description, and colour. Review the available labels and their descriptions to understand when to use each one. Labels are applied at the assignment level, and only one label can be applied to each assignment.
4 Core Features & Functions
4.1 Applying Labels to Assignments
Once Assignment labels are enabled in your course, you can apply them to any assignment during creation or by editing an existing assignment. Labels are selected from the Edit options sidebar and saved along with other assignment settings.
4.2 Viewing Labels from Student Perspective
Teachers cannot view labels the same way students do from the standard teacher interface. To see how a label appears to students, you must switch to Student view. This allows you to verify that the correct label has been applied and that it displays as intended.
4.3 Managing Labelled Assignments
Labels can be changed or removed from assignments at any time by editing the assignment options. If your administrator edits or deletes a label, those changes will automatically apply to all assignments where the label is used.
5 Step-by-Step Workflows
5.1 Applying a Label to a New Assignment
Objective: Create a new assignment and apply a custom label to provide students with clear requirement information.
Steps:
- Enter the assignment tool through the planner or resources.
- Enter an appropriate title for the assignment
- Provide a clear description of the assignment
- Fill out all custom information in the sidebar
- Scroll down to the bottom of the sidebar to find the Custom label section
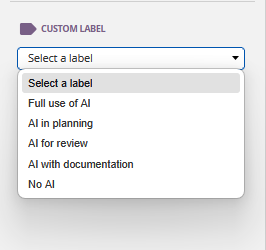
- Click on Select a label
- Choose the appropriate label from the available options
- Click "Create assigment"
Result: The assignment is created with the selected label, which students will see prominently displayed when they open the assignment.
Next Steps: Switch to Student view to verify the label displays correctly.
5.2 Applying a Label to an Existing Assignment
Objective: Add a custom label to an assignment you have already created.
Steps:
- Navigate to the assignment in Resources or Plans
- Open the assignment
- Click on Edit options in the sidebar
- Scroll down to the Custom label section
- Click on Select a label
- Choose the appropriate label from the available options
- Click Save
Result: The label is applied to the existing assignment and will be visible to students.
Next Steps: Switch to Student view to confirm the label appears as expected.
5.3 Viewing How Labels Appear to Students
Objective: Verify that a label has been applied correctly and see how it displays to students.
Steps:
- Navigate to your course
- Click on the ellipsis (three dots in the upper-right corner)
- Select Student view
- Navigate to Resources or Plans
- Open the assignment with the label
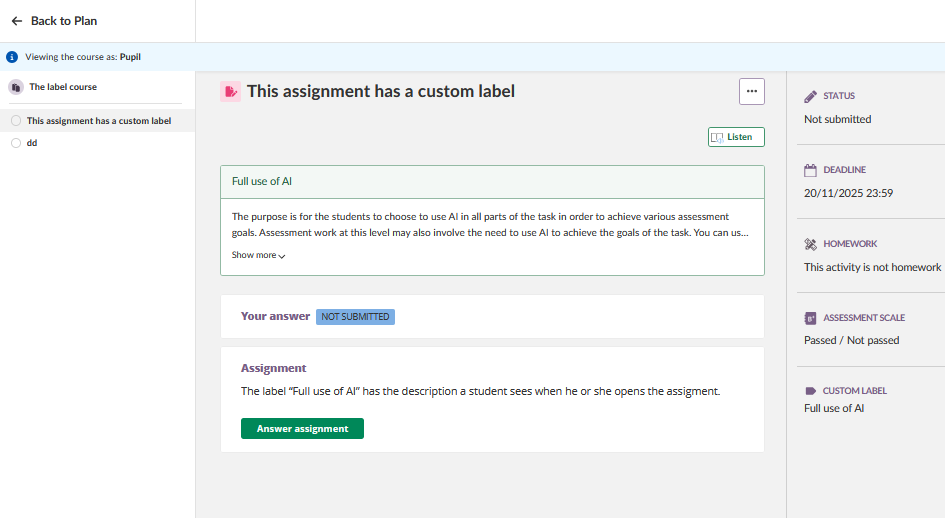
- Observe how the label appears at the top of the assignment
Result: You can see the assignment exactly as students will see it, with the label prominently displayed.
6 Settings & Customization
6.1 Course-Level Settings
Assignment labels must be enabled individually in each course where you want to use them. This allows you to control which courses utilise labels based on your teaching approach and course requirements. The setting is found in Course properties and features under the Functions section.
6.2 Label Selection
When applying a label to an assignment, you select from the labels created by your site administrator. Each label includes:
- A name (typically in uppercase for readability)
- A description explaining when to use it
- A colour that helps students quickly identify the label type
Only one label can be applied to each assignment. Choose the label that most accurately reflects the primary requirement or characteristic of the assignment.
7 Technical Information
7.1 System Limitations
Assignment labels have the following limitations:
- Only available in the Assignment tool
- One label per assignment maximum
- Cannot be viewed from teacher perspective without switching to Student view
- Cannot be created or edited by teachers (administrator management only)
- Labels are not available in other tools such as Tests or Projects
7.2 Label Availability
Labels are created and managed by your site administrator. You cannot create custom labels yourself. If you need a new label or want to suggest changes to existing labels, contact your site administrator. Changes made by the administrator to label names, descriptions, or colours will automatically apply to all assignments where those labels are used.
7.3 Student Experience
When students open an assignment with a label, the label appears prominently at the top of the assignment. The label includes both the name and description, providing students with immediate clarity about the assignment's requirements. Students can access labelled assignments from either Resources or Plans, and the label will display consistently in both locations.
8 Troubleshooting
8.1 Common Issues
Problem: Cannot see the option to add labels to assignments.
Cause: Assignment labels have not been enabled in your course settings.
Solution: Enable the feature by going to Settings > Course properties and features > Functions > Assignment labels and checking the box.
Prevention: Ensure Assignment labels are enabled in each course where you want to use them.
Problem: No labels appear in the Select a label dropdown.
Cause: Your site administrator has not created any labels yet.
Solution: Contact your site administrator to request that custom labels be created. Provide examples of the types of labels that would be useful for your assignments.
Prevention: Verify with your administrator that labels have been created before attempting to use the feature.
Problem: Cannot see how the label appears to students from the assignment editing view.
Cause: The teacher interface does not display labels in the same way students see them.
Solution: Switch to Student view by clicking the ellipsis (three dots) in the upper-right corner and selecting Student view. Navigate to the assignment to see how the label displays.
Prevention: Remember that Student view is required to see labels as they appear to students.
8.2 Assignment Label Problems
Problem: A label that was applied to an assignment has disappeared.
Cause: The site administrator deleted the label, which removes it from all assignments where it was used.
Solution: Contact your site administrator to understand why the label was removed. Apply a different label if appropriate, or leave the assignment without a label.
Prevention: Communicate with your administrator if you notice labels are being removed frequently.
Problem: A label's name or description has changed on existing assignments.
Cause: The site administrator edited the label, and changes automatically apply to all assignments where the label is used.
Solution: Review assignments with the changed label to ensure the new name or description still accurately reflects the assignment requirements. If not, select a different label or contact your administrator.
Prevention: Stay informed about planned changes to labels by maintaining communication with your site administrator.
Problem: Cannot apply more than one label to an assignment.
Cause: The system allows only one label per assignment.
Solution: Choose the label that most accurately represents the primary requirement or characteristic of the assignment. If multiple requirements need to be communicated, include additional details in the assignment description.
Prevention: Plan your label usage strategy so the most important information is conveyed through the label, with supplementary details in the assignment text.
9 Related Features & Cross-References
Assignment Tool: Custom labels are used exclusively within assignments. Understanding the full range of assignment features and options will help you use labels most effectively.
Resources and Plans: Students can access labelled assignments from both Resources and Plans. Understanding how these organisational tools work will help you ensure students can easily find and understand labelled assignments.
Student View: This feature allows you to see your course from the student perspective, which is essential for verifying how labels appear.
Course Settings: Managing course-level features, including Assignment labels, is done through Course properties and features.
More Help Resources
Have more questions? Please start with asking your school administrator.
Product Release notes
Stay updated with itslearning latest releases: https://itslearning.com/product-updates
Service Status
Check the current status of itslearning services: https://status.itslearning.com/
Ideas Portal
Share your ideas and help shape the future of itslearning: https://ideas.itslearning.com/
Roadmap
Check out our roadmap: https://itslearning.com/global/roadmap/