Tests - Getting started (Teacher)
TABLE OF CONTENTS
Introduction
This article shows teachers how to create, configure and publish a test in itslearning. It also covers reviewing results and reusing tests.
1 Overview
The Test tool allows you to create and deliver digital assessments with a variety of question types. Tests can be scored automatically, assessed manually, or a combination of both. You control what students see (scores, questions, correct answers and feedback) and when they see it.
You can share tests created in the Test tool in the itslearning Library. This allows you to share tests with other teachers across your school or district.
For detailed information on all settings, question types, scoring rules and advanced features, see Tests - Reference (Teacher).
2 Prerequisites
Prerequisite: You must have teacher rights, or equivalent editing rights, in the course where you want to create the test.
Prerequisite: A system administrator must enable the Test tool for your site. If you do not see the Test option when you add resources, contact your system administrator.
3 Step-by-step instructions
3.1 Creating a new test
- Go to the course where you want to add the test.
- Select the green Add button in Course overview, Resources or a Plan, and select Test. You can also create tests directly in the Library.
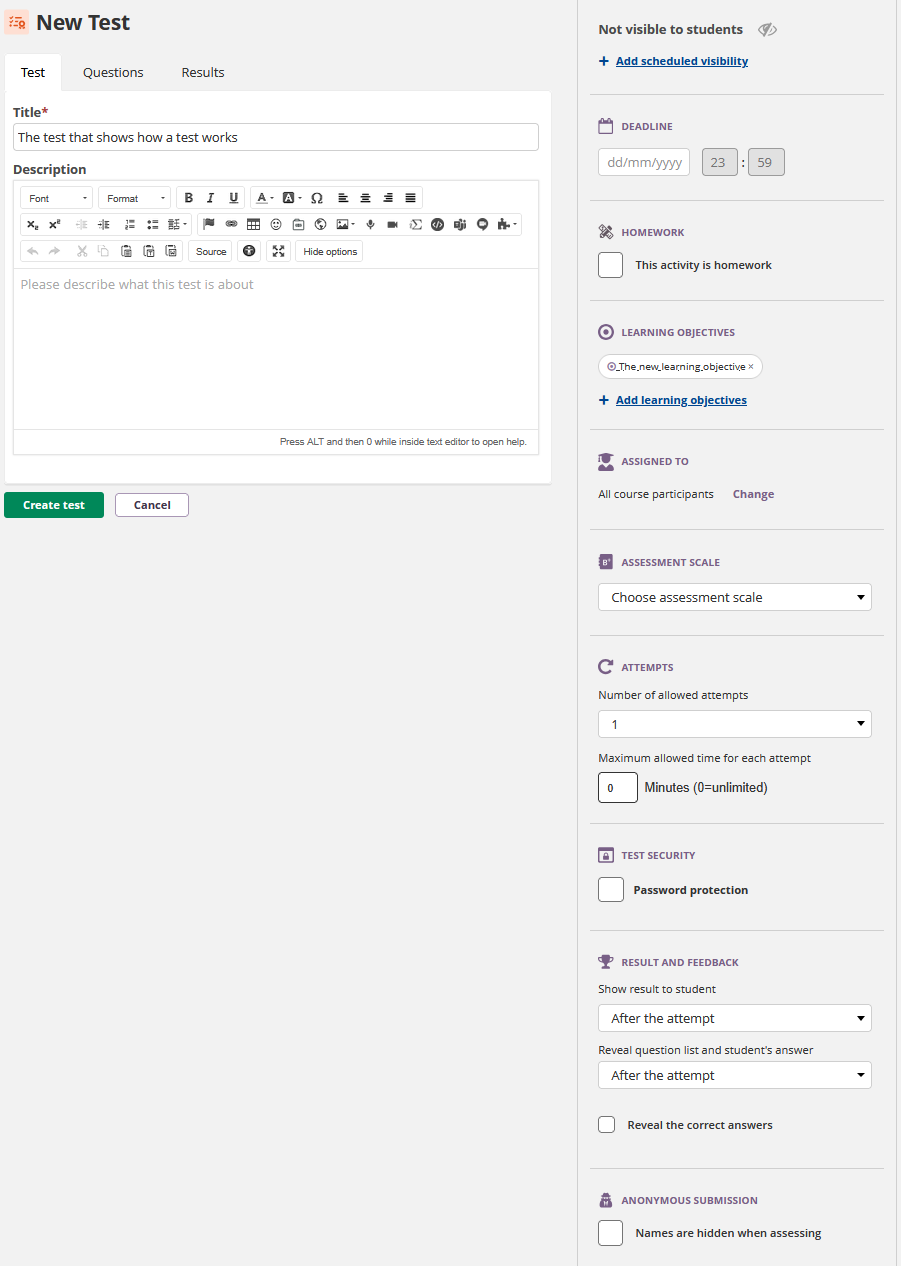
- Enter a Title. This is mandatory. The title appears in the course resources, the task list and the assessment record. It is plain text only. Keep it short so it displays well on smaller screens and in the mobile app.
- Optionally, add a Description. This rich text field is shown to students when they open the test, and in the Library when the test is shared.
- Select Create test.
Note: A new test is set to "Not visible to students" by default. You can safely add questions and configure settings before you make the test available.
3.2 Adding questions
- In the test, go to the Questions tab.
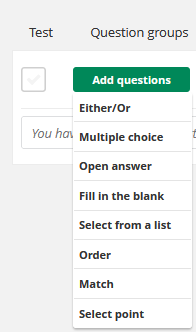
- Select Add questions and select a question type from the drop-down list.
- Enter the question text and configure the answer options for the chosen type.
- Set the score value for the question.
- Select Save to add the question, or Save and new to create another question straight away.
Repeat these steps for each question. You can also import questions in QTI v2.1 format with the Import button.
Managing questions
- To rearrange the question order, drag the vertical ellipsis (three dots) on the left of each question. This is the default order. You can also present questions to students in random order.
- To delete a question, use the drop-down list next to the question number, or select the checkbox and select the delete icon.
- To duplicate a question, use the drop-down list next to the question number.
- A question without text is given a standard title with the question type and number. This standard title is not shown to students.
For details on each question type, scoring rules and advanced options, see Tests - Reference (Teacher).
3.3 Configuring settings
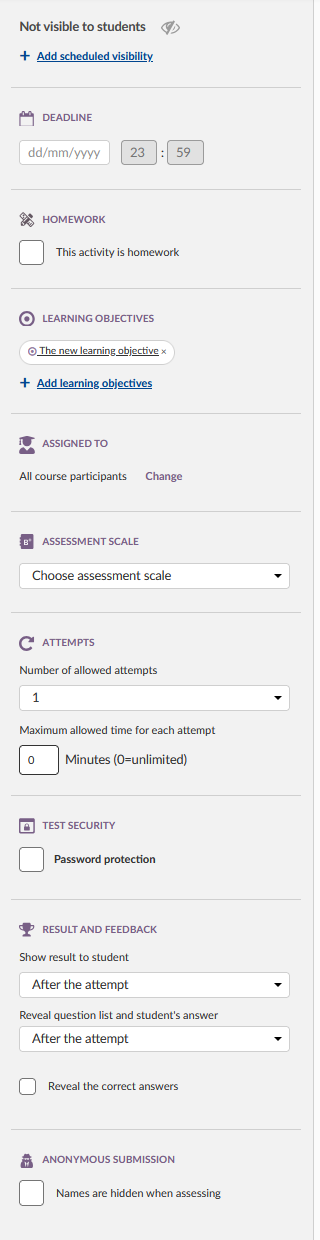
Settings are in the sidebar on the right. Consider these key settings before you publish your test:
- Deadline: Set a date and time when submissions close.
- Number of allowed attempts: Choose how many times students can take the test. If you allow more than one attempt, select which attempt counts: best, first or last.
- Time limit: Optionally, set a maximum time per attempt in minutes. Set the value to 0 for unlimited time.
- Question navigation: On the Questions tab, use the navigation button to choose Forward only, Free navigation or Show all questions on one page.
- Question order: On the Questions tab, use the order button to choose Normal or Random order.
- Result and feedback: Decide when students can see their results.
- Show result to student: Controls when the score and assessment become visible.
- Reveal question list and student's answers: Controls whether students can see the questions and their own answers after submission.
- Reveal the correct answers: Controls whether students can see which answers are correct.
- Test security: Optionally, enable password protection or Test mode browser.
For a complete list of all settings and their behaviour, see Tests - Reference (Teacher).
3.4 Reviewing your test
Review the test before you make it visible to students, to check for errors.
- Go to the Test tab.
- Select Review test.
- Take the test as if you were a student.
After the review, you see the results. The attempt is not stored and is not included in any reports. Teachers always see results in review mode, even if the results are hidden for students. This lets you check the full test experience, including the result display and the marking of correct and wrong answers.
If Test mode browser is enabled, you can also review the test using Test mode browser.
Note: When you use "View as student" mode in the course, the Test tool may not determine your role and permissions correctly. Use the Review test function instead of taking the test in "View as" mode.
3.5 Making the test visible to students
- In the sidebar, change the visibility from Not visible to students to Visible to students.
- Students can now see the test in the course and begin taking it.
To set a specific date and time when the test becomes visible, use Add scheduled visibility.
3.6 Reviewing results and assessing
- Open the test and go to the Results tab.
- The summary section shows key statistics: students who have not submitted, maximum score, average score, and highest and lowest scores.
- Select a student row to open a detailed view of the attempt.
- For questions that require manual assessment (marked "Needs assessment"), select Edit scores and enter a score for each question.
- Select Send scores to save.
- Optionally, select Add feedback to enter a short comment on the attempt (maximum 255 characters).
Scores and feedback become visible to students according to your result and feedback settings.
To download results, select Export result data. To analyse the quality of your questions, select Export question analysis. See Tests - Reference (Teacher) for details on the analysis columns.
3.7 Reusing questions and tests
You can reuse existing content when you build new tests.
- Open an existing test and use the available options to copy questions or duplicate the entire test.
- Adjust the question text, scoring or feedback in the new test as needed.
Tests that are shared in the Library can be added to other courses.
4 Troubleshooting
4.1 Students cannot see the test
Symptoms: Students report that the test is missing from the course.
Solution:
- Check the visibility setting and set it to Visible to students if needed.
- Check the deadline and any scheduled visibility settings.
4.2 Students cannot see their results
Symptoms: Students completed the test but do not see scores or feedback.
Solution:
- Open the test settings and review the result and feedback options.
- Adjust the timings if you want students to see information earlier.
For additional troubleshooting, see Tests - Reference (Teacher).
More Help Resources
Have more questions? Please start with asking your school administrator.
Product Release notes
Stay updated with itslearning latest releases: https://itslearning.com/product-updates
Service Status
Check the current status of itslearning services: https://status.itslearning.com/
Ideas Portal
Share your ideas and help shape the future of itslearning: https://ideas.itslearning.com/
Roadmap
Check out our roadmap: https://itslearning.com/global/roadmap/