Resource Page – Reference (Teacher)
TABLE OF CONTENTS
- Introduction
- 1 Video overview
- 2 Prerequisites & Requirements
- 3 Getting Started
- 4 Core Features & Functions
- 5 Step-by-Step Workflows
- 6 Settings & Customisation
- 7 Troubleshooting
- 8 Additional Resources
Introduction
The Resource Page is itslearning's central hub for managing course materials, activities, and content. The updated Resource Page improves accessibility, navigation, and overall design to provide a cleaner and more user-friendly experience for both teachers and students.
Use the Resource Page to organise course materials, create assignments and tests, manage file uploads, control visibility settings, and structure your course content. The updated interface supports all users, including those who rely on screen readers or keyboard navigation. Teachers have full access to manage resources, whilst students can view visible resources and download permitted materials.
1 Video overview
2 Prerequisites & Requirements
User Permissions:
- Teacher role for full resource management
- Student role for viewing visible resources and downloading materials
Required Setup:
- Active course with appropriate user role assigned
3 Getting Started
3.1 Accessing the Resource Page
To access the Resource Page:
- Navigate to your course
- Select Resources from the course menu
- The Resource Page displays all course materials in a table format
3.2 Understanding the New Interface
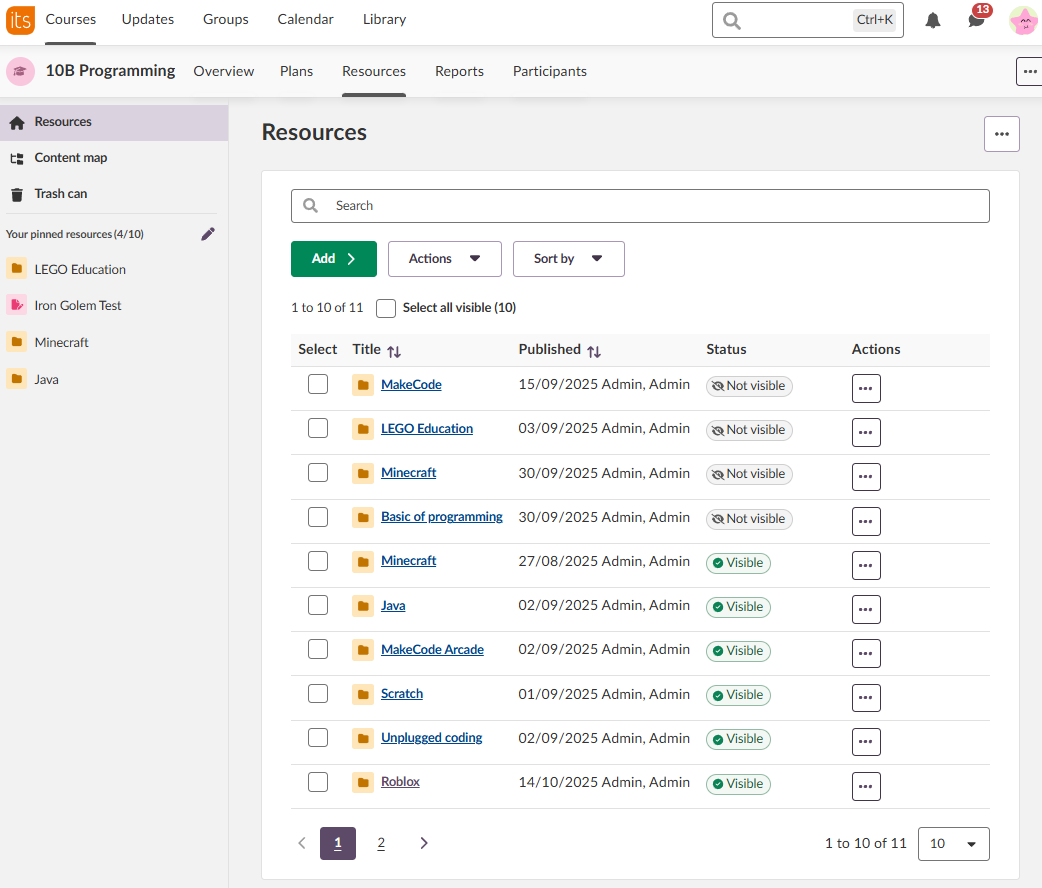
The new Resource Page includes several key components:
Main Features:
| Element | Description |
|---|---|
| Search field | Finds resources throughout the course (searches both visible and hidden items for teachers) |
| Add button | Creates new resources, activities or ready-to-use content |
| Action menu | Manages individual resources |
| Bulk actions | Manages multiple resources simultaneously |
| Sort options | Organises content by structure, title, or publication date |
| Pagination | Controls how many resources display per page |
| Pinned resources | Provides quick access to frequently used items |
| Breadcrumbs | Shows your current location and allows quick navigation between folders when you are in a sub folder |
Sidebar Navigation:
| Tab | Description |
|---|---|
| Resources | Displays all course materials in table format |
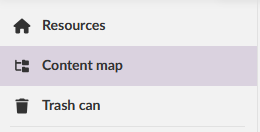
| Content Map | Provides visual navigation of course structure (alternative to Reorganise) |
| Trash can | Contains deleted items (recoverable for number of days set by administrator) |
4 Core Features & Functions
4.1 Search and Navigation
Search Field:
The search field locates any resource in your course:
- Enter keywords or resource names in the search field
- Results display immediately as you type
- Both visible and invisible resources appear in results

Breadcrumbs:
Breadcrumbs show your current location within the resource structure. Click any breadcrumb segment to navigate directly back to that folder level.

Note: The browser's back button and the breadcrumb navigation serve different purposes. Breadcrumbs navigate within the folder hierarchy on the current page. The browser's back button returns you to the previous page you visited, which may not be the folder you navigated from. To move between folder levels within the Resources page, please use the breadcrumbs.
4.2 Adding Resources
Click the green Add button to create new content.

This opens a new page with options for all the:
- Resources (files, links, folders etc)
- Activities (assignments, tests, discussions etc)
- Ready-to-use content for example from the library or a SCORM package, depending on whats made available in your district.
4.3 Action Menu
4.3.1 Dropdown action menu
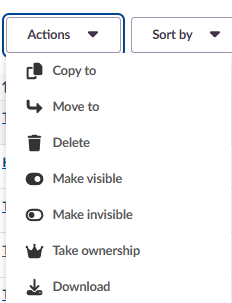
The dropdown Action menu provides options for managing individual and bulk resources:
| Action | Description |
|---|---|
| Copy to | Duplicates a resource whilst keeping the original |
| Move to | Relocates a resource to a different folder or course |
| Delete | Moves a resource to the trash can (recoverable for 100 days) |
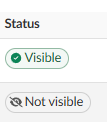
| Make Visible | Makes a resource viewable for students (displays green status) |
| Make Invisible | Hides a resource from students (displays grey status) |
| Take Ownership | This function allows you to change the displayed author of a course resource to yourself. It is primarily useful for housekeeping purposes; for example, when a colleague has left the school and you want to update the attribution so their name no longer appears on course materials. Note that "Take ownership" only changes the displayed name. It does not affect editing rights (which are controlled by the Permissions system) and has no connection to library sharing. |
| Download | Downloads folders and files to your computer |
To use the Action menu:
- Select the checkbox next to a resource
- Click the Actions dropdown at the top of the table
- Choose the desired action
4.3.2 Individual Action menu (...)
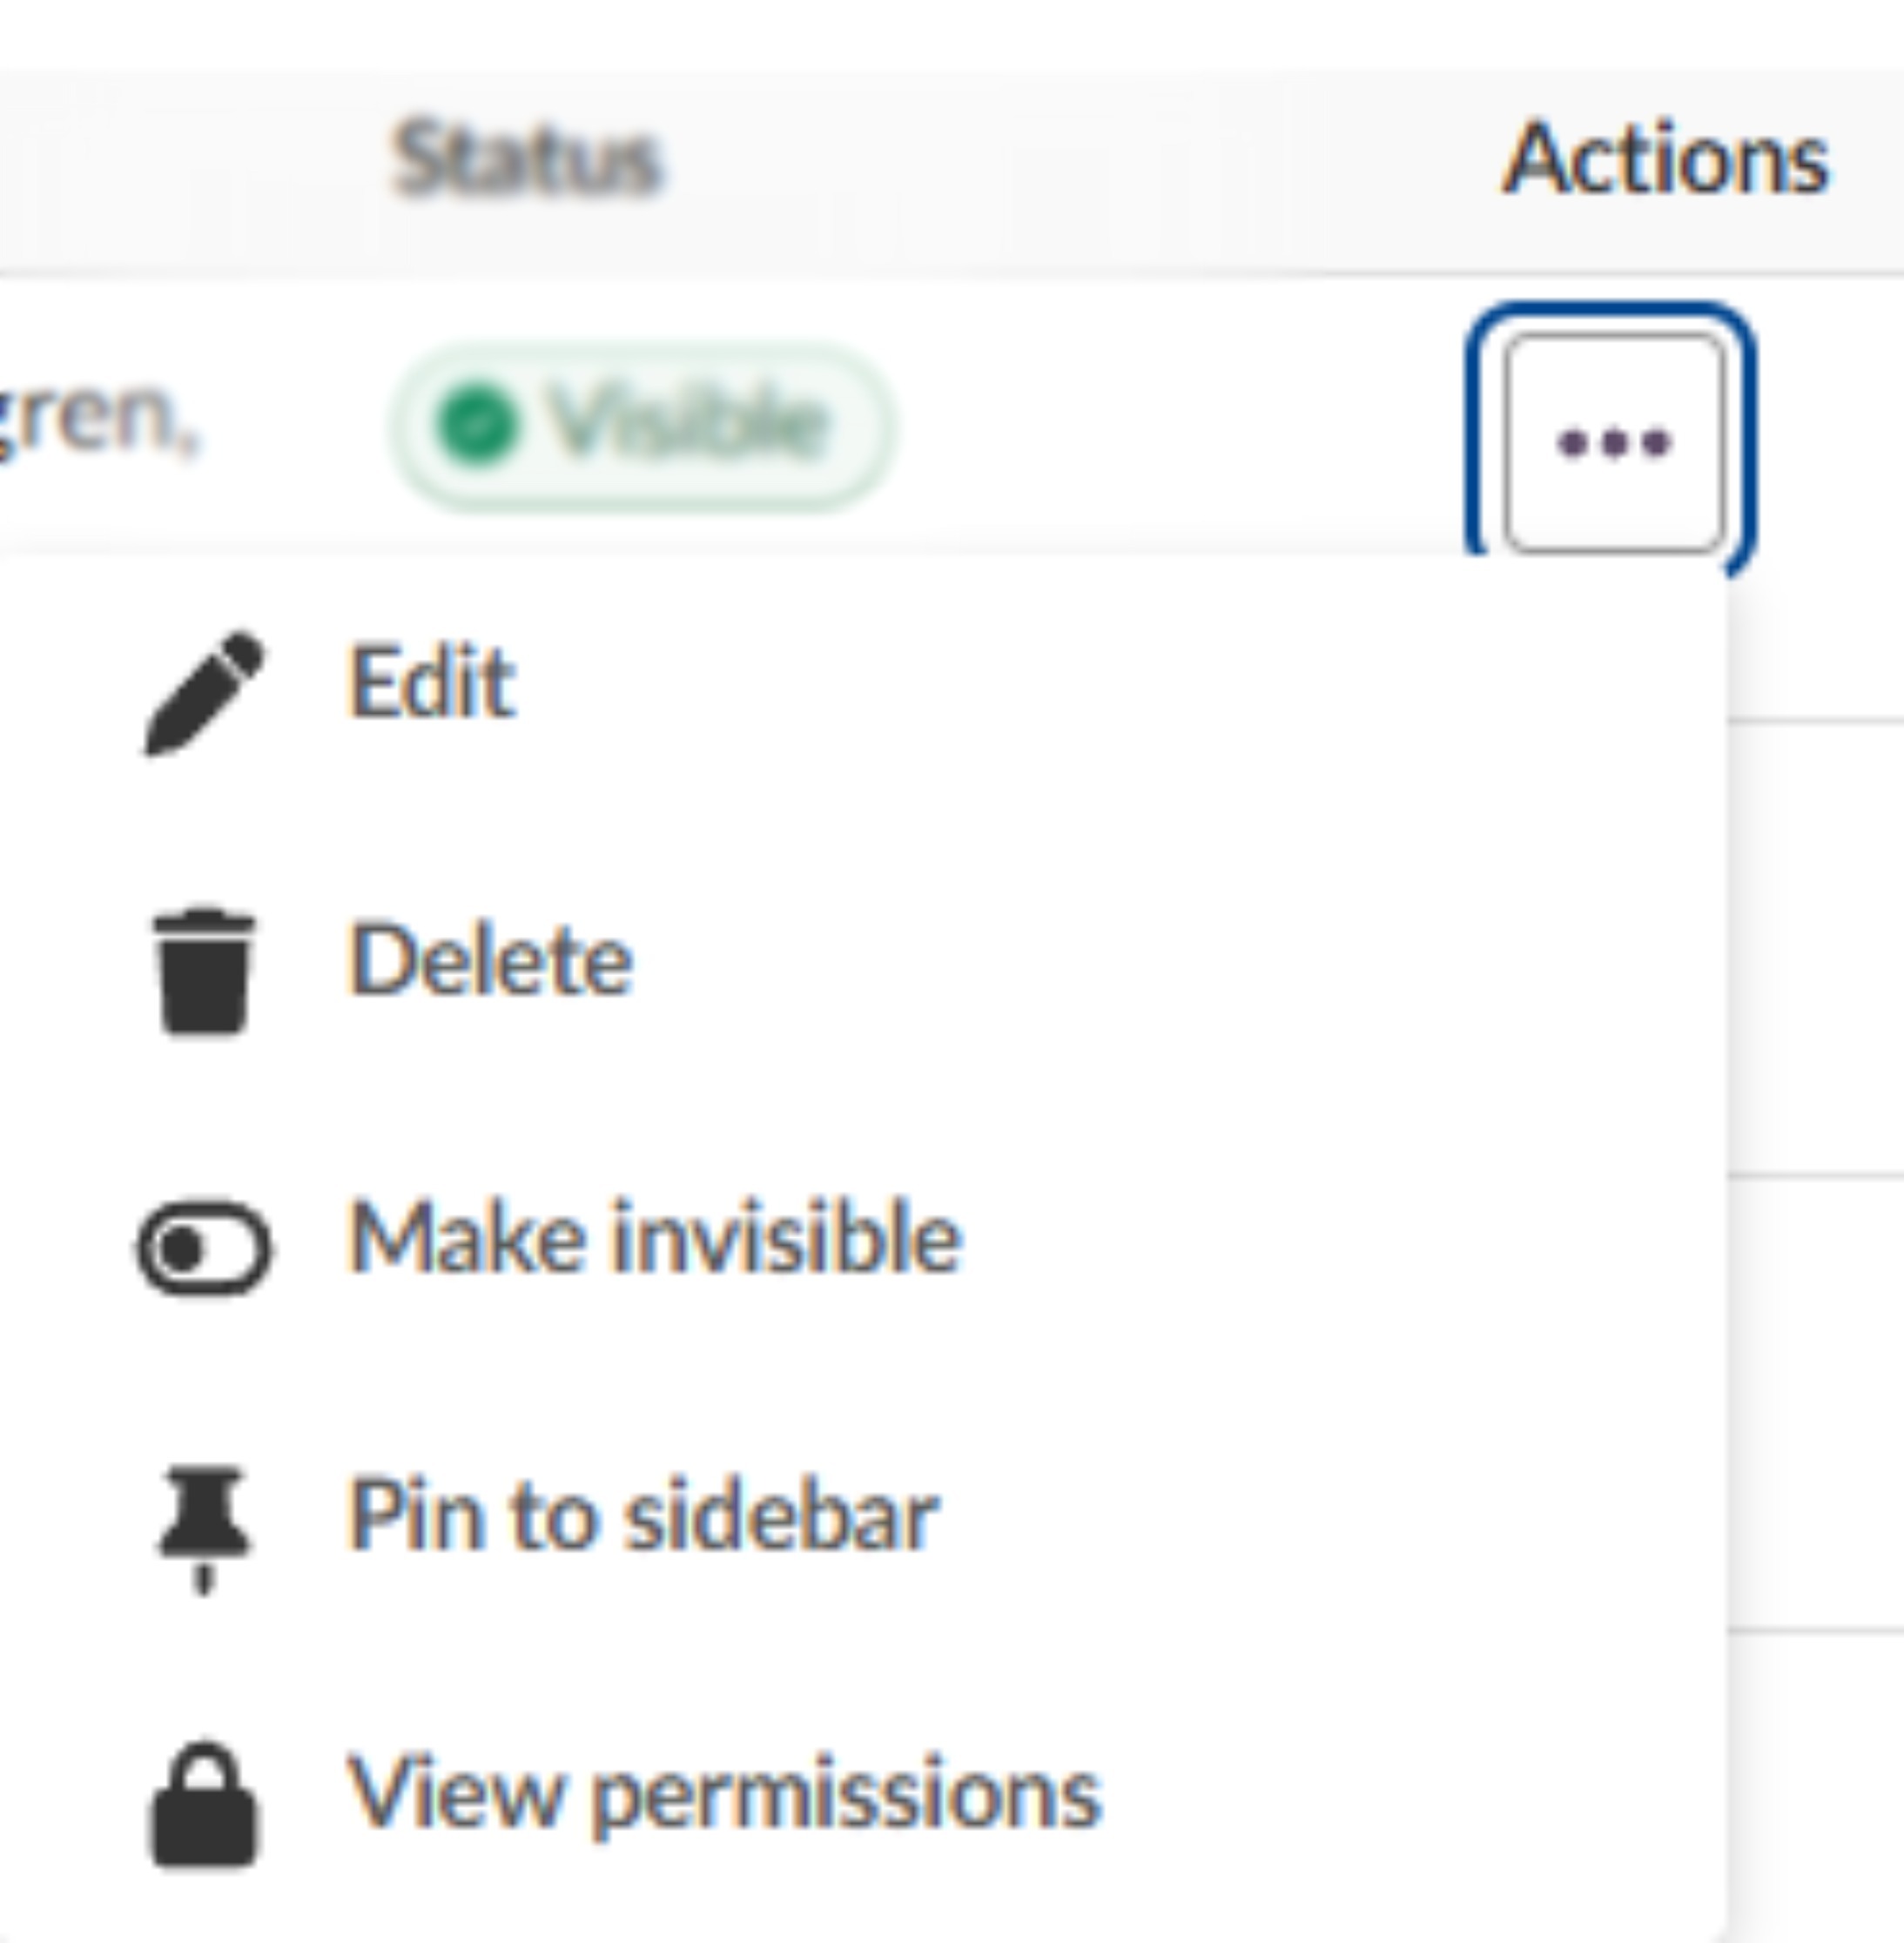
The (...) action menu provides options for the specific resource:
Edit: Opens the resource and lets you edit its content
Delete: Deletes the resource
Make invisible/visible: Toggles invisibility on/off for student view
Pin to Sidebar: Lets you pin resources to the sidebar
View permissions: Opens the permission page for the resource
4.3.3 Pinned Resources
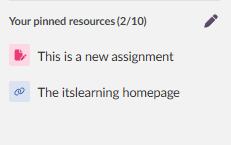
Pinned resources provide quick access to up to 10 frequently used items. Pins are personal for individual users, so teachers cannot pin resources for students.
To Pin a Resource:
- Locate the resource
- Click the three dots next to the resource name
- Select Pin
The resource appears in the Your Pinned Resources section in the sidebar.
To Unpin Resources:
Navigate to Your Pinned Resources
- Click Edit (Pencil)

- Click the X next to resources you wish to remove and it instantly happens
- Click Done when you are finished editing
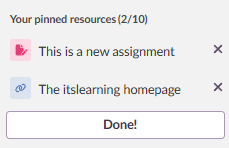
The counter shows how many pins you have used (e.g., "5/10").
Note: When using Student View, pinned resources do not display. A message clarifies: "The view does not include pinned resources, as they are individual."
4.4 Page Options Menu
The three-dot menu located next to the "Resources" heading provides page-level options for managing the resource section.
To access the Page Options Menu:
- Locate the three-dot icon (ellipsis) next to the "Resources" heading at the top of the page
- Click to reveal the available options
Available Options:
Make learning path: Create a learning path from resources in your course.
Permissions: Access the permissions page for the resource section.
Reorganise: Manually reorder resources using drag and drop (alternative to Content Map)

Note: This menu is separate from the individual resource action menu (three dots in the Actions column of the table) and the Course menu (top right corner of the page). Each menu serves a different purpose:
| Option | Description |
|---|---|
| Page Options Menu (next to "Resources" heading) | Controls page-level settings |
| Individual Resource Menu (Actions column) | Manages specific resources |
| Course Menu (top right) | Accesses course-wide features |
4.5 Folder Options Menu
When you are inside a folder, the three-dot menu next to the folder heading provides additional options for managing that specific folder.
To access the Folder Options Menu:
- Navigate into a folder
- Locate the three-dot icon (...) next to the folder name at the top of the page
- Click to reveal the available options
Available Options:
Make learning path: Create a learning path from resources in this folder
Permissions: Access the permissions page for this folder
Copy: Create a copy of this folder
Edit: Edit the folder's name and settings
Reorganise: Manually reorder resources within this folder using drag and drop
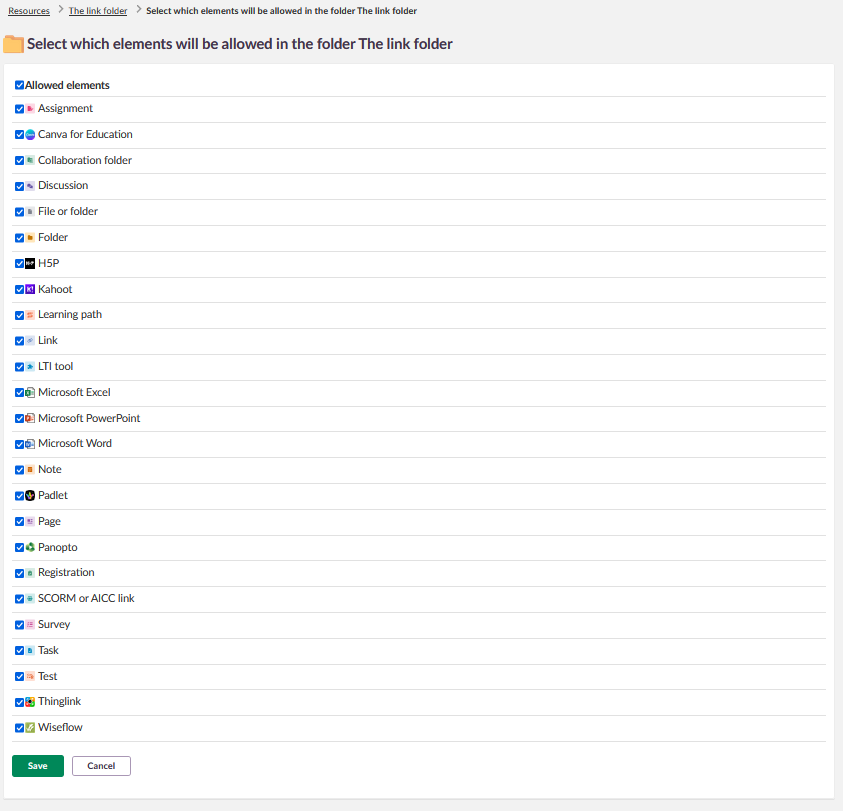
Select the elements to allow: Choose which resource types can be added to this folder (e.g., only Assignments and Tests, or all resource types)
Delete: Delete this folder and its contents (moves to trash can)
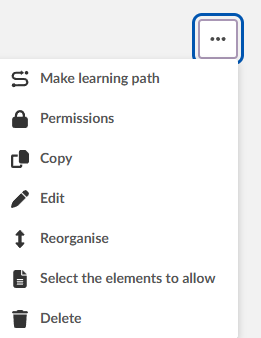
Note: This menu differs from the Page Options Menu at the top level (section 4.4), which only shows Make learning path, Permissions, and Reorganise. The Folder Options Menu includes additional options specific to managing the folder itself.
4.5.1 Select the elements to allow
This option lets you restrict which types of resources can be added to a folder. This can be useful for keeping folders organised; for example, a "Tests" folder could be limited to only allow Test resources.
To configure allowed elements:
- Open the Folder Options Menu
- Select "Select the elements to allow"
- Check or uncheck the resource types you want to allow
- Click Save
By default, all available element types are allowed.
5 Step-by-Step Workflows
5.1 Copying Resources
Objective: Create a duplicate of a resource whilst keeping the original.
Steps:
- Select the checkbox next to the resource
- Open the Actions dropdown
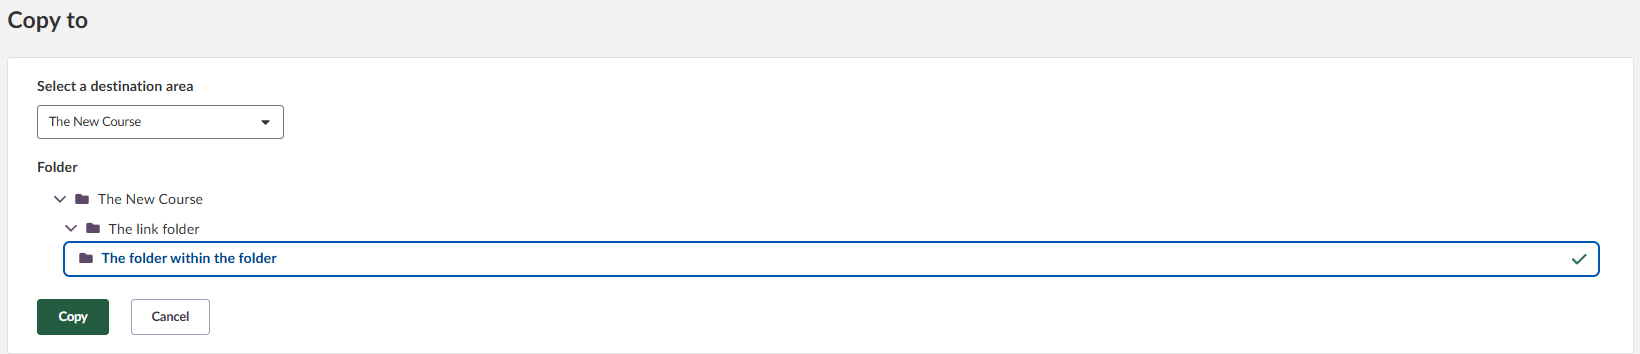
- Select Copy to
- Choose the destination folder
- Decide whether to "Include submissions and results" (if applicable)
- Click the green Copy button
Result: The resource is copied to the selected folder. The original remains in place.
To Copy to Another Course:
Click the dropdown to view all your courses, then select the destination course and folder.
5.2 Moving Resources
Objective: Relocate a resource to a different folder or course.
Steps:
- Select the checkbox next to the resource
- Open the Actions dropdown
- Select Move to
- Choose the destination folder
- Click the green Move button
Result: The resource moves to the new location. You lose access to it at the original location.
5.3 Deleting Resources
Objective: Remove unwanted resources from the course.
Steps:
- Select the checkbox next to the resource
- Open the Actions dropdown
- Select Delete
- Confirm the deletion in the warning message
Result: The resource moves to the trash can, where it can be restored for a set number of days, decided by your site's sysadmin.
5.4 Managing Visibility
To Make Resources Visible:
- Select the [...] next to the resource
- This opens the Actions dropdown
- Select Make visible
- Confirm the action
The resource displays with a green status tag and becomes visible to students.
To Make Resources Invisible:
- Select the [...] next to the resource
- This opens the Actions dropdown
- Select Make invisible
- Confirm the action
The resource displays with a grey status tag and is hidden from students.
5.5 Downloading Resources
Folders and files in Resources can be downloaded to your computer. Selected content is packaged into a ZIP archive before download.
Important: The following limits apply to all Resource downloads:
- Maximum ZIP file size: approximately 2 GB
- Maximum number of files and folders per ZIP: 65,535
If either limit is exceeded, the download may not complete successfully. Download content in smaller batches to stay within these limits.
Note: Only folders and files can be downloaded. Tests and other activity types cannot be downloaded and will display an error message if selected.
- Select the checkbox next to the resource.
- Open the Actions dropdown.
- Select Download.
- Monitor the download progress.
- Click Download (filename) when ready.
5.6 Using Bulk Actions
Objective: Manage multiple resources simultaneously.
Steps:
- Select the checkbox next to the resources you want to affect
- Access bulk actions using either method:
- Actions dropdown menu: Located at the top of the table between Add and Sort by buttons
- Bulk actions toolbar: Appears automatically at the bottom of the page showing individual action buttons when selecting one or more resources.
Using the Actions Dropdown:
- Select resources using checkboxes
- Click the Actions dropdown
- Choose from available actions
Using the Bulk Actions Toolbar:
When resources are selected, a toolbar appears at the bottom with these buttons:

| Action | Description |
|---|---|
| Copy to | Duplicate selected resources |
| Move to | Relocate selected resources |
| Delete | Remove selected resources |
| Make visible | Show selected resources to students |
| Make invisible | Hide selected resources from students |
| Take ownership | Claim ownership of shared resources |
| Download | Download selected files and folders |
| Clear selection | Deselect all items |
Select All Visible:
Click "Select all visible (number)" above the table to select all items currently displayed based on your pagination settings.
Result: Actions apply to all selected resources at once. The counter displays "X of Y selected" to show your progress.

6 Settings & Customisation
6.1 Sort Options
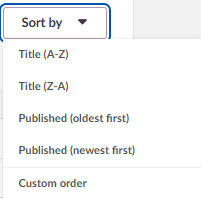
Use the Sort by dropdown to change how resources are ordered:
Title:
- Resources sort alphabetically
- Use the table filter to reverse the order (A-Z or Z-A)
Published:
- Resources sort by publication date (newest to oldest)
- Use the table filter to reverse the order (oldest to newest)
Custom order:
- Custom order displays resources in the same sequence as they are arranged in the folder structure. When this sort option is selected, the system does not apply alphabetical or date-based sorting. Instead, items appear exactly in the manual order defined in the resource tree (folders and items), reflecting the structure set by the user.

6.2 Pagination Settings
Control how many resources display per page:
- 10 items per page
- 25 items per page
- 50 items per page
- 100 items per page
Pagination numbers appear at the bottom of the table for navigating between pages.

6.3 Reorganising Resources
There are two methods to reorganise resources in your course. Each serves different purposes:
6.3.1 Content Map (Recommended for Multi-Level Reorganising)
The Content Map allows you to reorganise resources at any level, including items within folders.
To reorganise using Content Map:
- Navigate to Content Map from the sidebar
- Click the Reorganise contentbutton in the top right corner
- Expand folders by clicking the arrow next to them to access contents
- Grab the drag handle (six dots) next to any resource
- Drag and drop the resource to the desired position
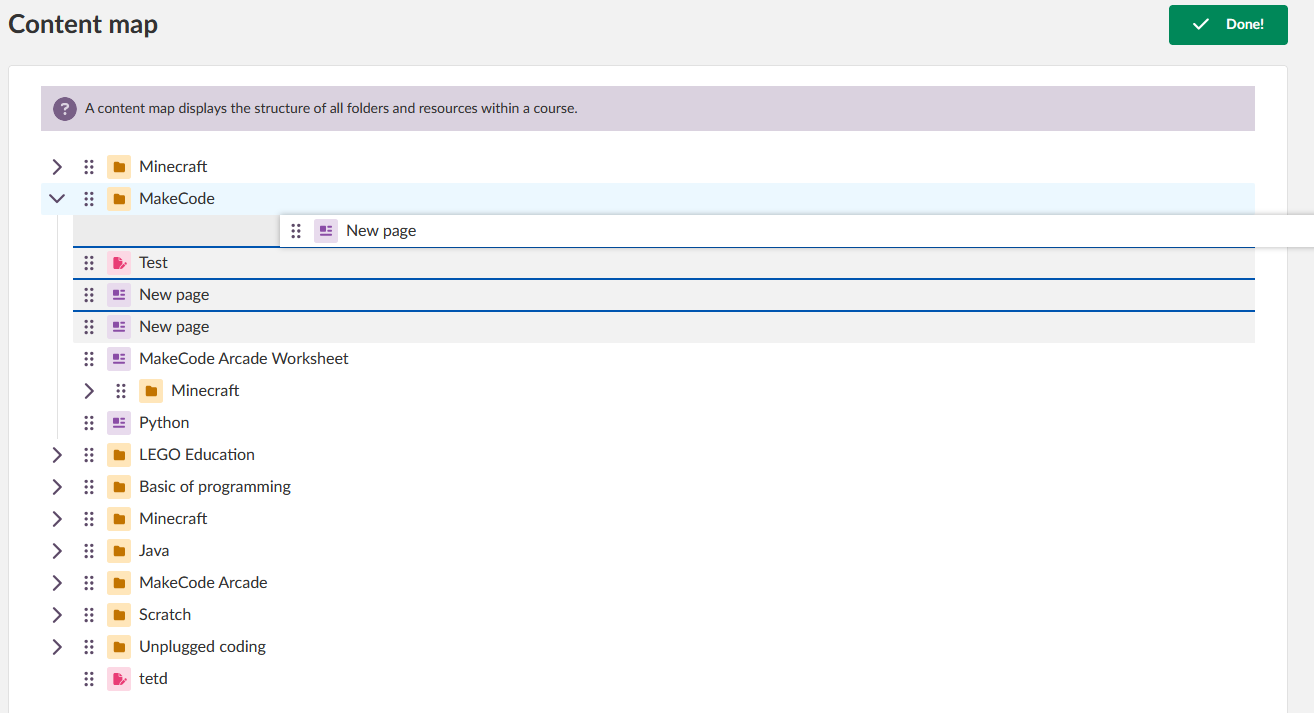
- Click the green Done! button to exit the reorganisation feature.
Benefits: Access and reorganise resources at all levels of your course structure, including items nested within folders.
6.3.2 Page Options Menu (Top-Level Only)
The Reorganise option from the Page Options Menu allows quick reordering of top-level resources only.
To reorganise from Page Options Menu:
- Click the three dots (ellipsis) next to the "Resources" heading
- Select Reorganise

- A new page opens showing top-level resources only
- Grab the drag handle (six dots) next to any resource
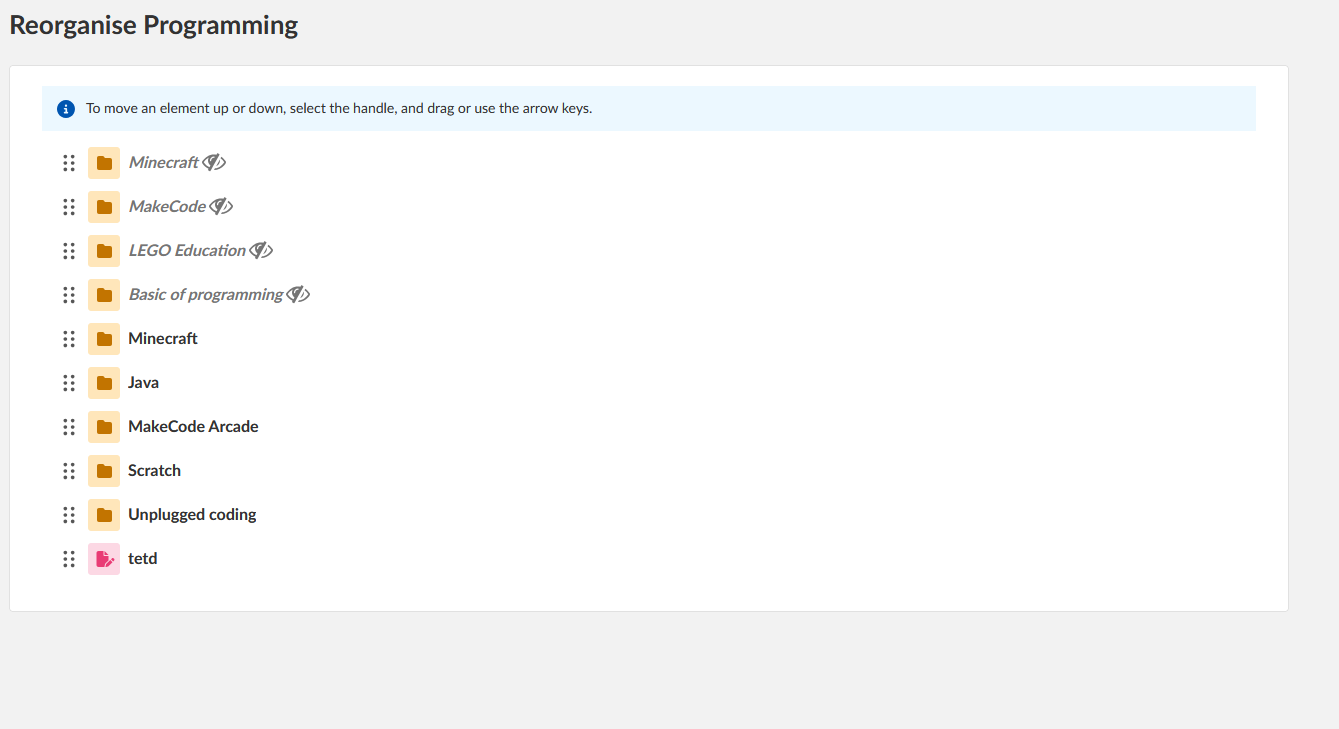
- Drag and drop the resource to the desired position
- Changes save automatically
Limitation: This method only displays top-level folders and resources. You cannot access or reorganise items within folders using this method.
Result: Both methods override your current Sort By setting. Choose Content Map for comprehensive reorganising across all levels, or use the Page Options method for quick top-level adjustments.
7 Troubleshooting
7.1 Common Issues
Problem: Cannot find a specific resource
Solution:
- Use the search field to search by name
- Navigate through folders using breadcrumbs
- Check the trash can if the resource may have been deleted
- Verify you have appropriate permissions
Problem: Cannot download a resource
Solution:
- Verify the resource type - only folders and files can be downloaded
- Tests and other activity types cannot be downloaded
- Check for error messages indicating unsupported resource types
Problem: Pinned resources not appearing in Student View
Solution:
- This is expected behaviour - pins are individual to each user
- Teachers cannot create pins for students
- Each student must create their own pins
Problem: Cannot pin additional resources
Solution:
- Check you haven't reached the 10-pin limit
- Navigate to Your Pinned Resources and click Edit
- Remove unwanted pins by clicking the X
- Click Done and try pinning again
Problem: Bulk actions not working
Solution:
- Ensure resources are properly selected (checkboxes ticked)
- Verify the bulk actions panel appears at the bottom
- Check you have appropriate permissions
- Try the action on a single item first to identify specific issues
7.2 Error Messages
Error: "Not possible to download a test"
Explanation: The download function only supports folders and files. Tests and certain other activity types cannot be downloaded.
Resolution: Use alternative export or backup methods specific to that activity type. These can vary between resources, but there will usually be a "copy to" option in itslearning, and full courses can be exported in various formats. It is also possible to share most resources through the itslearning library if you have access.
8 Additional Resources
Contact Support: For additional support, contact your itslearning administrator or visit the itslearning support pages
Note: System Administrators: For unresolved issues, contact your itslearning Key Account Manager or support team with error messages and screenshots.
More Help Resources
Have more questions? Please start with asking your school administrator.
Product Release notes
Stay updated with itslearning latest releases: https://itslearning.com/product-updates
Service Status
Check the current status of itslearning services: https://status.itslearning.com/
Ideas Portal
Share your ideas and help shape the future of itslearning: https://ideas.itslearning.com/
Roadmap
Check out our roadmap: https://itslearning.com/global/roadmap/
The features shown are part of the project within the framework of the German Development Project (GDP), a cooperation between four German states and itslearning with the aim of improving digital education in Germany through tailor-made product developments.
Click here to learn more about the GDP roadmap and what other features you can expect.
For German readers: Click here for more information about the project within the framework of the German Development Project.