TABLE OF CONTENTS
- 1 Overview
- 2 Prerequisites
- 3 Create a Survey
- 4 Create a Survey with AI
- 5 Share and Print a Survey
- 6 View Responses
- 7 Export Results
- 8 Technical Limits
- 9 Troubleshooting
1 Overview
The Survey tool allows you to collect responses from course participants using a variety of question types. Surveys can be set to anonymous, and optionally made available to participants outside itslearning via a link or QR code (external surveys).
Surveys work on all devices and require a network connection.
Once responses are collected, you can view individual submissions, a question-by-question summary, and export all data to an Excel file.
2 Prerequisites
- You must have teacher access to the course where you want to add the survey.
- To use the AI survey generation feature, your site administrator must have enabled AI.
3 Create a Survey
3.1 Initial Setup
Surveys can be added directly from a plan or from Resources. Adding the survey through a plan is recommended, as it connects the activity to your lesson structure and makes it easier for students to follow the intended learning sequence.
3.1.1 Adding a survey through a plan (recommended)
Open the course and go to Plans.
Open the plan you want to add the survey to.
Click Add at the bottom of the plan's activity list.
In the dropdown, click Show all.

On the Activities page, select Survey.

The survey setup page opens. Click Change title to enter a title for the survey.
Optionally, enter an introduction in the Introduction field.
Under Survey type, configure the following:
- Anonymous – Enabled by default. Respondents cannot be identified.
- External – Allows anyone with the link to respond. External surveys are always anonymous.
Click Save.

You are taken to the Questions tab. The survey is now part of the plan and visible in the plan's activity list.

Note on visibility: New plans are not visible to students by default. Surveys and other activities added to a plan inherit the plan's visibility status. When you make the plan visible, all connected elements that have not had their activation settings manually overridden will become visible to students at the same time. This behaviour requires the plan setting Make connected elements visible when the plan is made visible to be enabled, which it is by default.
If you change the visibility or activation setting on the survey itself before saving, the survey will no longer follow the plan's activation. Changes to the plan's visibility will not affect it after that point.
Surveys added directly to Resources are not visible to students by default and must be made visible manually.
3.1.2 Adding a survey directly to Resources (alternative)
Use this method only if the survey is not connected to a specific plan.
- Open the course and go to Resources.
- Click Add and select Survey.
- Follow steps 6–9 above.
3.2 Add Questions
After saving the initial setup, you are taken to the Questions tab.
- Click Add question.
- Enter the question text in the Question field. This field cannot be left empty.
- Select a question type from the Question type dropdown.
- Configure the answer options as required by the question type.
- Click Save to save the question, or Save and new to save and immediately add another question of the same type.
Note: A blue confirmation banner appears when a question is saved. Pressing Tab once after this banner takes you directly to the question text field for the next question.
To reorder questions, drag and drop them using the drag handle. Using a keyboard: press Space on the drag handle to select a question, use the arrow keys to move it, then press Space again to confirm the new position.
To delete a question, select it using the checkbox and click Delete.
Important: The question type can only be changed when adding a new question. It cannot be changed when editing an existing question.

3.3 Question Types
The survey tool supports four question types:
Open question – Respondents enter free text. No answer options are configured by the teacher.
Yes/No question – Respondents select either Yes or No.
Multiple-choice question – Respondents select one or more answers from a list you define. You can add up to 20 answer alternatives.
Matrix question – Respondents evaluate a series of statements using the same set of answer alternatives. The question text serves as a general description of what respondents should consider. Statements are entered as rows, and answer alternatives as columns. Respondents give one answer per statement. You can add up to 20 statements and 20 answer alternatives.
Matrix example:
3.4 Predefined Answer Alternatives
For multiple-choice and matrix questions, you can select a predefined set of answer alternatives instead of entering them manually.
The available predefined lists are:
| List name | Alternatives (top → bottom) |
|---|---|
| Custom (default – results in blank fields) | – |
| Numbered scale (1–5) | 1 · 2 · 3 · 4 · 5 |
| Agreement | Strongly disagree · Disagree · Neither agree nor disagree · Agree · Strongly agree |
| Quality | Very poor · Poor · Fair · Good · Excellent |
| Satisfaction | Not at all satisfied · Slightly satisfied · Moderately satisfied · Very satisfied · Completely satisfied |
| Importance | Not at all important · Slightly important · Moderately important · Very important · Extremely important |
| Frequency | Never · Rarely · Sometimes · Often · Always |
| Emojis | ? · ? · ? |
3.5 Preview a Survey
Before distributing a survey, use the Preview survey button on the Questions tab to check how the survey looks and behaves for respondents. During preview, each question has a shortcut to open its edit view. Saving from the edit view returns you to the preview.

4 Create a Survey with AI
Requirement: This feature must be enabled by your site administrator.
When adding a new survey, a second tab labelled Create survey with AI is available at the top of the page.
- Click Create survey with AI.
- In the The survey is about field, enter a brief description of the survey topic. Keep the input short and focused. Do not write "This is a survey about…" as this is added automatically.
- Select the number of questions to generate: 5, 7, 10, or 15.
- Set the survey type using the toggles:
- Anonymous
- External – anyone with the link can respond
- Click Generate survey.
The input is sent to Azure OpenAI (EU-hosted) for processing. A survey with an introduction and multiple-choice questions is generated based on your input.
All generated questions are multiple-choice and use the Agreement predefined answer scale (Strongly disagree to Strongly agree).
Once generated, the survey can be edited in the same way as a manually created survey. Review the content before making it available to students. itslearning does not guarantee the accuracy of content produced by the AI service.
Note: Surveys created with AI are not visible to students by default, regardless of whether they are added through a plan or directly to Resources. Set the survey to visible in the side panel once you have reviewed and approved the generated content.
Note: The input field is limited to 255 characters.

5 Share and Print a Survey
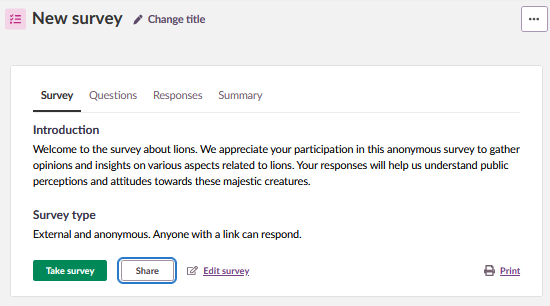
After a survey has been created and saved, the Survey tab displays the survey introduction, survey type, and a row of action buttons: Take survey, Share, Edit survey, and Print.
5.1 Share an External Survey
When a survey is set to External, you can share it with anyone — including people who do not have an itslearning account. External surveys are always anonymous.
- Open the survey and go to the Survey tab.
- Click Share.
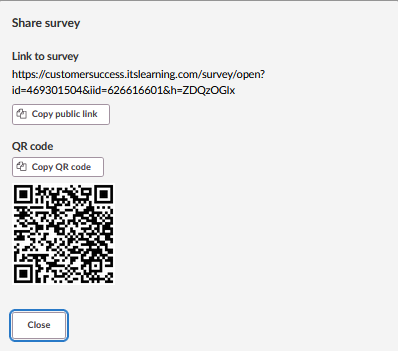
- The Share surveydialog opens, displaying:
- Link to survey – A public URL that can be sent via email, messaging, or embedded in a website. Click Copy public link to copy it to your clipboard.
- QR code – A scannable QR code that links directly to the survey. Click Copy QR code to copy the image to your clipboard for use in documents, posters, or presentations.
- Click Close when finished.
Note: The Share button is only available for surveys with the External setting enabled. For non-external surveys, participants access the survey directly in the course.
5.2 Print a Survey
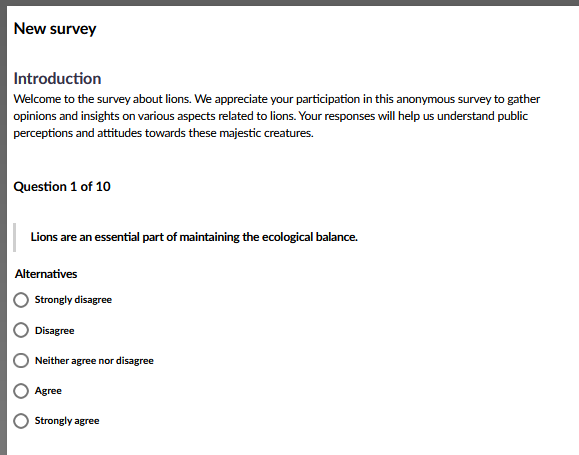
Click Print on the Survey tab to open a print-friendly version of the survey. This displays the survey title, introduction, and all questions with their answer alternatives in a format suitable for printing or saving as a PDF.
6 View Responses
6.1 Responses Tab
Once respondents begin answering the survey, the Responses tab is populated. The list shows both ongoing and submitted responses, along with a timestamp indicating when each response was submitted or started.
From this list, you can:
- Open a submitted response to view the individual answers.
- Delete a submitted response.
- Delete an ongoing response.
If you allow submission after the deadline, late submissions are marked in the Note column.

6.2 Summary Tab
The Summary tab shows an aggregated view of all submitted responses, organised by question. For each question, the summary shows the total number of responses and how many respondents answered that specific question. This allows you to identify unanswered questions.

7 Export Results
From the Summary tab, click Download responses (Excel) to export all responses as an Excel file.
The export contains two sheets:
- Questions – lists all survey questions.
- Responses – lists all individual responses.
For non-anonymous surveys, additional user information is included in the export.

8 Technical Limits
| Item | Limit |
|---|---|
| Maximum number of questions per survey | 100 |
| Maximum answer alternatives per multiple-choice question | 20 |
| Maximum statements per matrix question | 20 |
| Maximum answer alternatives per matrix question | 20 |
| AI input field character limit | 255 characters |
| AI-generated question counts available | 5, 7, 10, 15 |
9 Troubleshooting
Create survey with AI tab is not visible
Symptoms: The Create survey with AI tab does not appear when adding a new survey.
Cause: The AI feature has not been enabled for your site.
Solution:
- Contact your site administrator and ask them to enable the AI feature.
Survey is not visible to students
Symptoms: Students report they cannot see the survey in the course.
Cause: New surveys are set to not visible by default.
Solution:
- Open the survey.
- In the side panel, locate the visibility setting.
- Set the survey to visible.
- Verify the deadline is set correctly if applicable.
Cannot change question type
Symptoms: The question type dropdown is greyed out when editing a question.
Cause: The question type can only be selected when a question is first created. It cannot be changed when editing.
Solution:
- Delete the existing question.
- Click Add question and create a new question with the correct question type.
Note: Deleting a question with existing responses will remove those responses permanently.
Share button is not available
Symptoms: The Share button does not appear on the Survey tab.
Cause: The survey is not set to External. The Share button is only available for external surveys.
Solution:
- Click Edit survey on the Survey tab.
- Enable the External toggle under Survey type.
- Click Save.
Note: Enabling External also enables Anonymous. External surveys are always anonymous.
More Help Resources
Have more questions? Please start with asking your school administrator.
Product release notes
Stay updated with the latest itslearning releases: https://itslearning.com/product-updates
Service status
Check the current status of itslearning services: https://status.itslearning.com/
Ideas portal
Share your ideas and help shape the future of itslearning: https://ideas.itslearning.com/
Roadmap
Check out the itslearning roadmap: https://itslearning.com/global/roadmap/