Course Card Images
TABLE OF CONTENTS
Overview
The Courses page provides a streamlined interface for students and teachers. Each course card provides quick access to updates, announcements, and weekly tasks.
Teachers can personalise cards by providing an image, colour, title, and featured teacher. All users can reorder the course cards, search for specific courses, and hide courses they are no longer active in. This layout helps students and teachers navigate courses, manage tasks, and stay informed.

The course card provides course title, image, colour, teacher image and a summary of follow-up tasks and new announcements.

1. Course cards
1.1 Actions available to all users
- Reorder courses: Drag and drop cards to create a custom sort order.
- Search for a Course: Use the 'Search by course name' input field to locate specific courses.
- Sort Courses: Organize the list alphabetically, by last visited, last updated, or your own sorting.
- Unstar Courses: Hide courses you are no longer actively engaged with. Unstarred courses are moved to the bottom of the page. Unstarred courses are removed from the calendar and notification bell.
1.2 Actions available to teachers
In addition to the actions above, teachers can edit the appearance of course cards. These actions are accessible through the three dots (⋯) menu on each course card:
- Friendly name: Name your course into something readable if it’s made up by codes. For example, ‘MAT9380-b' can be name something more intuitive like 'Mathematics’.
- Add or change image: Illustrate your course with an image to support navigation, signify content and enhance student engagement.
- Card color: Provide a color label for your course. The color appears on the course card, inside the course, and from the calendar. The color can be used to support students in identifying their course.
- Select teacher to feature: Choose which teacher’s name and profile picture are displayed on the card.


2. Course card images
Teachers can add images to make course cards more visually appealing and easier to navigate.
The course card image aspect ratio is 2:1 (landscape orientation). High-resolution images are resized to 600 px width, which is sufficient for maintaining quality on an iPad with retina display.
There are three ways to upload a course image:
- During course creation.
- By editing the course card.
- From the Course properties and features page.
If a template course includes an image, any new courses based on that template will inherit the same image unless the user uploads a different one during course creation.


2.1 Adding an image when creating a new course
1) On the Courses page, the Create new course page can be reached from the Create course button.
 2) To open the image dialog, press the Add image button at the bottom of the page.

3) In the dialog, an image can uploaded by either opening your system’s file explorer by pressing the Add image area, or by simply dragging and dropping an image file into the Add image area.
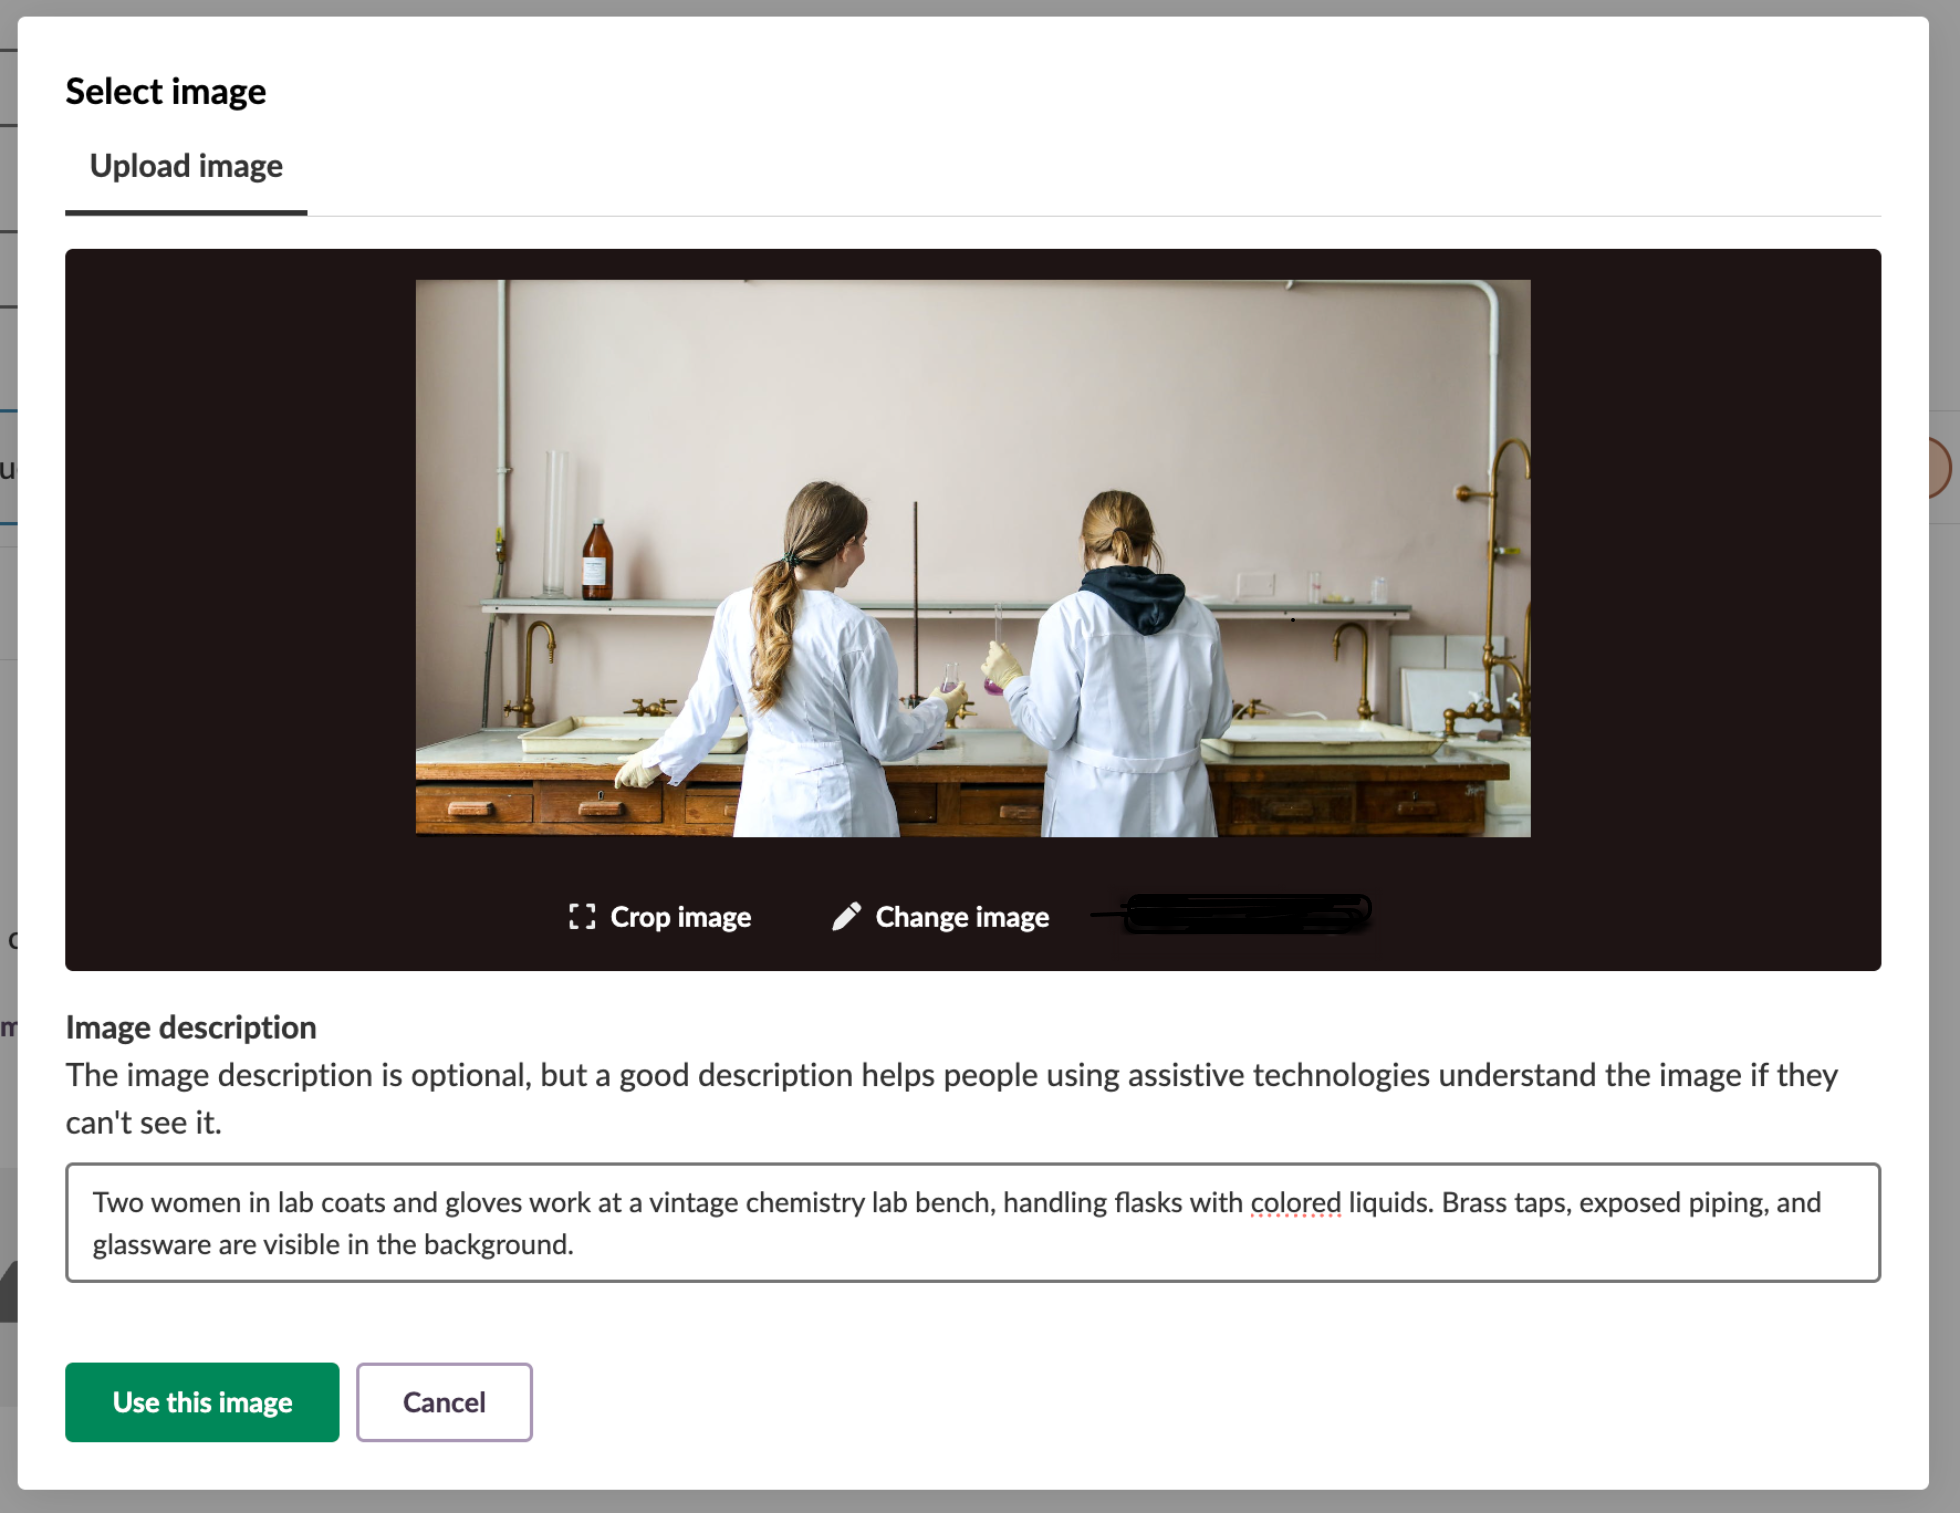
For an uploaded image, you have the following actions available:
- Crop image: Adjust the crop using the Crop image button. The crop always follows a 2:1 aspect ratio.
- Change image: Upload a new image using the Change image button to replace the current.
- Image description: You can add an image description for users who rely on assistive technologies
2.1.1 Template Courses and Images
Template courses can include predefined images that automatically apply to new courses created from the template. The process of using a template course can be found here: Article About Template Courses.
For the purpose of this article we have included a short description of the process:
Creating courses from templates with images:
- Click "Create course" on the itslearning start page.
- Enter the course title and select a course color.
- Click "Browse templates".
- Select the desired template course from the available options.
- The template's image will automatically appear in the preview.
- To use the template image, proceed with "Create course".
- To override the template image, click "Add image" and upload a different file.
- Click "Create course" to finalize the course with your selected image.
Template image inheritance: New courses created from templates automatically inherit the template's image unless a different image is uploaded during the course creation process.
2.2 Adding a course image from the Courses page
Images can be added in the course card dialog, accessible through the options menu (⋯).
- Teachers can upload, change, or remove the image.
- An image description can be added for users who rely on assistive technologies.
- Image cropping is not available in this dialog.
- A link to the Course properties and features is provided in the dialog, where the image cropping functionality is available.

2.3 Adding a course image from Course properties and features page
The Course properties and features page can be reached either through the course card dialog or by navigating to the course, opening the Options menu (⋯) and pressing Settings.

On the Course properties and features page, find the Image area and press the Add image button to open the image dialog.
- The image dialog is the same as on the Create new course page referenced further up in this document.
- Cropping is only available when uploading a new image.

Note: The Course Properties and Features page contains additional settings for course configuration, assessment options, learning objectives, and permissions. For complete documentation of all available settings, see the Course Properties and Settings article.
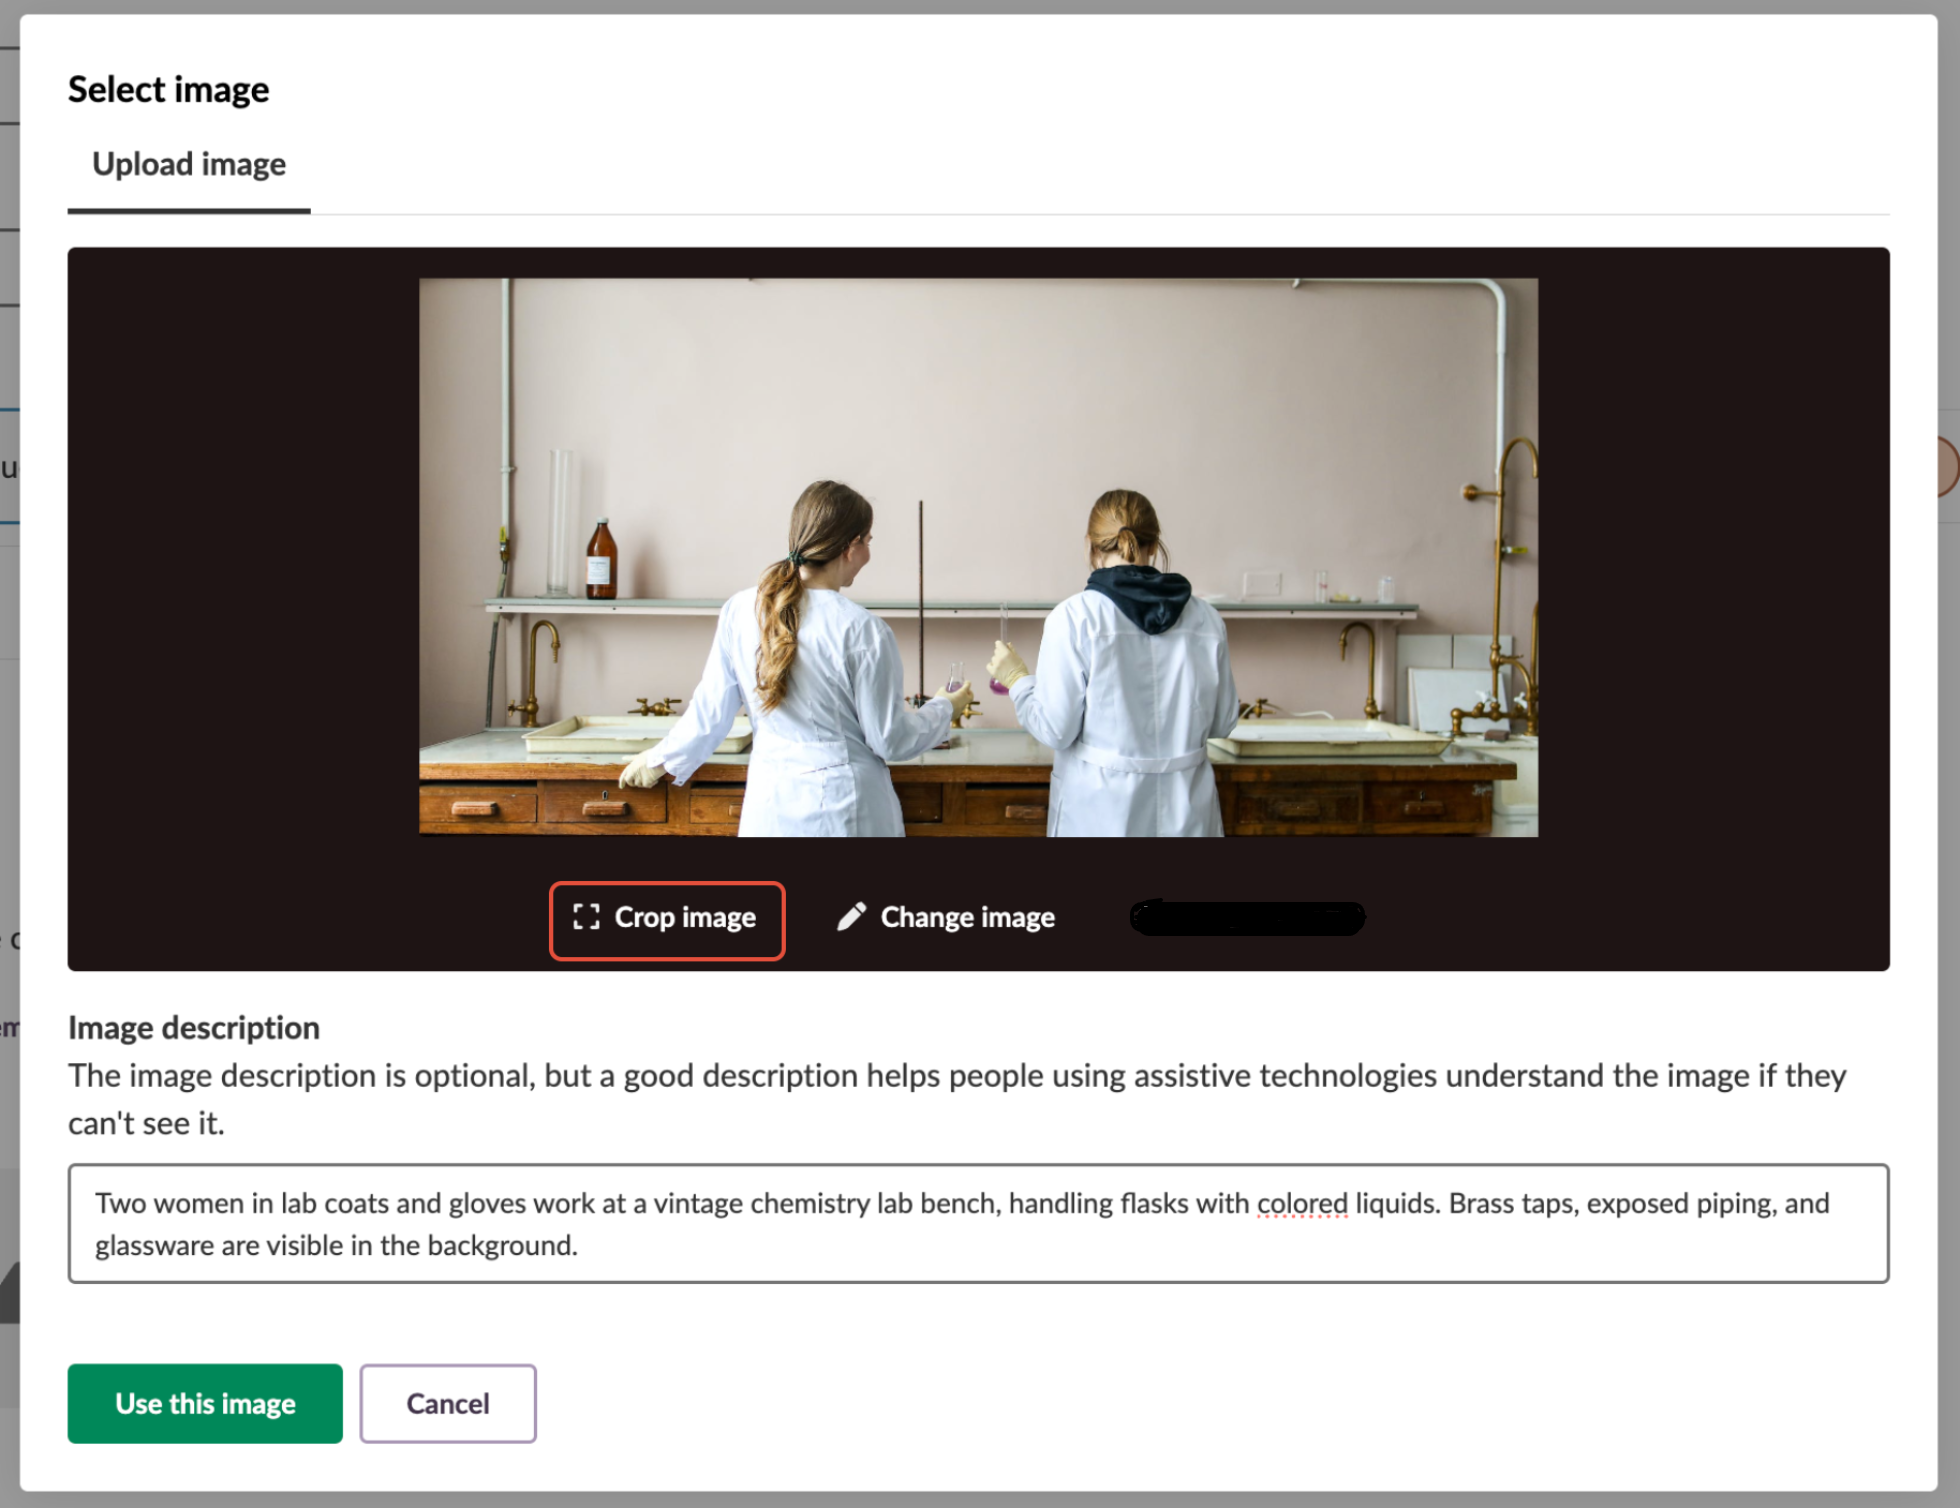
3. Image cropping
Images can be cropped by users with our built-in image cropping functionality.
Press Crop image to open the cropping tool.
3.1 Crop using your pointer device
The cropping frame can be adjusted using any pointer device such as mouse, touchpad or touchscreen on smartphones and tablets.
- Move the frame to adjust the crop, and drag the corners to resize it.
- The frame size can be adjusted using the corners to adjust the size of your crop.
- The crop always follows a 2:1 aspect ratio.
- Press Save to confirm the crop.

3.2 Crop using the keyboard
The image cropping tool is accessible for keyboard users and supports screen readers.
- Move the crop frame by tabbing into it and using the arrow keys.
- Resize the frame by tabbing to each corner and adjusting as needed.
- Tab to the Save button and press Enter to confirm the crop.

4. Technical specifications
- Supported file formats: JPEG and PNG files only.
- Image dimensions: Course cards use 2:1 aspect ratio (landscape orientation).
- Image processing: High-resolution images are automatically resized to 600px width for optimal display quality.
- File size limit: Maximum upload size is 5 MB.
- Error handling: If an image exceeds the size limit, the system displays: "The file is too large. The maximum allowed file size is 5.00 MB."
The features shown are part of the project within the framework of the German Development Project (GDP), a cooperation between four German states and itslearning with the aim of improving digital education in Germany through tailor-made product developments.
Click here to learn more about the GDP roadmap and what other features you can expect.
For German readers: Click here for more information about the project within the framework of the German Development Project.