TABLE OF CONTENTS
- 1 Overview & Introduction
- 2 Prerequisites & Requirements
- 3 Getting Started
- 4 Core Features & Functions
- 5 Step-by-Step Workflows
- 6 Settings & Customisation
- 7 Technical Information
- 8 Troubleshooting
- More Help Resources
1 Overview & Introduction
Policy is a collection of profile settings that can be assigned to profiles or individual users within an organisation (such as a school or site). Policies override default profile or user settings, allowing administrators to apply specific rules without editing profiles. This provides flexibility for schools to manage their own rules independently from the rest of the site.
Important behaviour of policies
Policies are always assigned at profile or individual level, even if you select a group or class in the hierarchy.
- If a user moves to another group or class, the policy stays with the user until it is removed or the policy is deleted.
- Adding a new student to a group does not automatically apply the policy; you must assign it manually.
- If a student changes schools within the same site, the policy will not follow them unless it is a site-wide policy created by a system administrator.
2 Prerequisites & Requirements
Permissions:
- Policy management must be granted via profile or policy.
- This permission gives access to User and access rights and Policies.
System access:
- Administrator tab in itslearning.
Dependencies:
- Profiles must exist before policies can override their settings.
Note! Because of earlier use cases of overly restrictive policies on system administrator profiles, some policy settings are not available for these users.
3 Getting Started
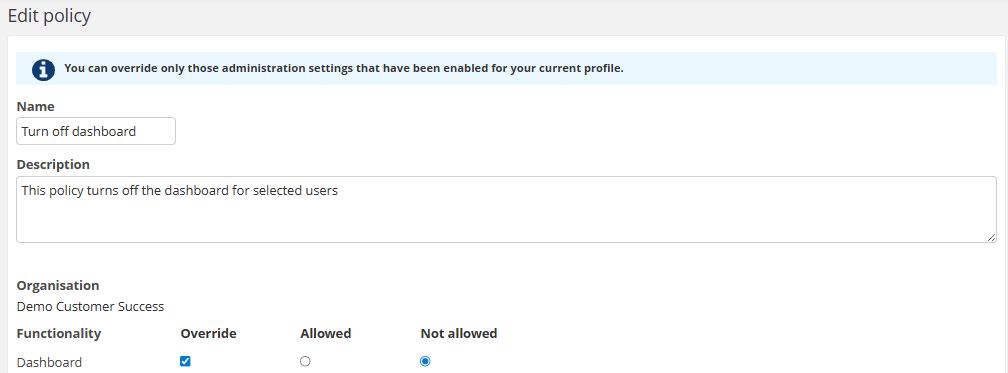
3.1 Create a Policy
1. Click Administration and select Policies

2. Click Add policy
Note! For system administrators: on this page, you can filter policies by organisation. If you only want to see policies from one school on your site, open the Organisation dropdown and select the school or organisation you need.

3. Complete the fields:
- Name: Policy name (appears in the policy list)
- Description: Brief explanation, e.g. Turns off messages for students
- Organisation: Select school or site
- Functionality: Choose functions to include
4. Tick Override for each setting you want to change
5. Select Allowed or Not allowed for each overridden setting
6. Click Save
3.2 Configure Policy Settings
- You can combine multiple settings in one policy.
- You can also assign multiple policies to the same profile or user if needed.
Note! Policies are always set on an individual or profile level, even if you choose a group or class in a hierarchy. This means a policy will follow the user, even if you move them in the hierarchy. For example, a policy set for a class (such as disabling the messenger system) will follow the individuals in the group if they change classes later.
4 Core Features & Functions
- Create, assign, and delete policies
- Override default profile settings for flexibility
- Delegate policy management to school administrators
- Apply policies at organisation, profile, or individual level
Practical examples:
- Enable messages for students when disabled by default
- Disable messages temporarily for specific learners
- Set school dashboard as login start page
- Increase personal storage for advanced users
5 Step-by-Step Workflows
5.1 Assign existing Policy to profiles
1. Go to Administration > Policies
2. Locate the policy and click No profiles
3. Select profiles to assign
4. Click OK
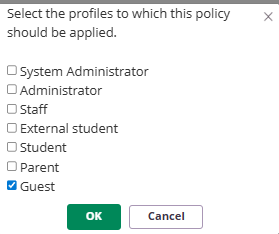
When you return to the policy overview, you will see the policy updated with the profile name it is activated for.

5.2 Assign existing Policy to individual users or groups
1. Go to Administration > Policies
2. Click the + by Add users
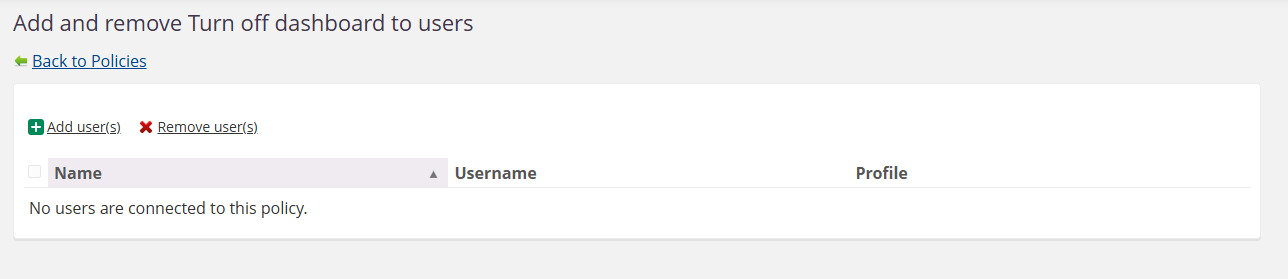
3. Search users by name, course, hierarchy or profile
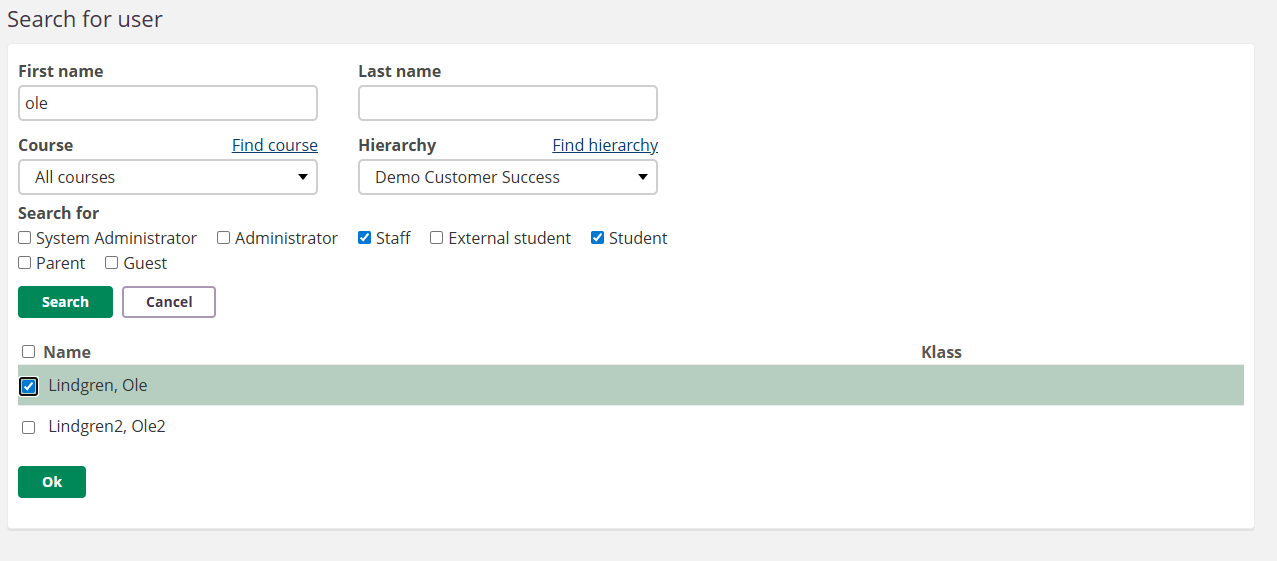
4. Select users and click OK
5. Go back to the policies overview to see it updated with the user count (and profile from earlier)

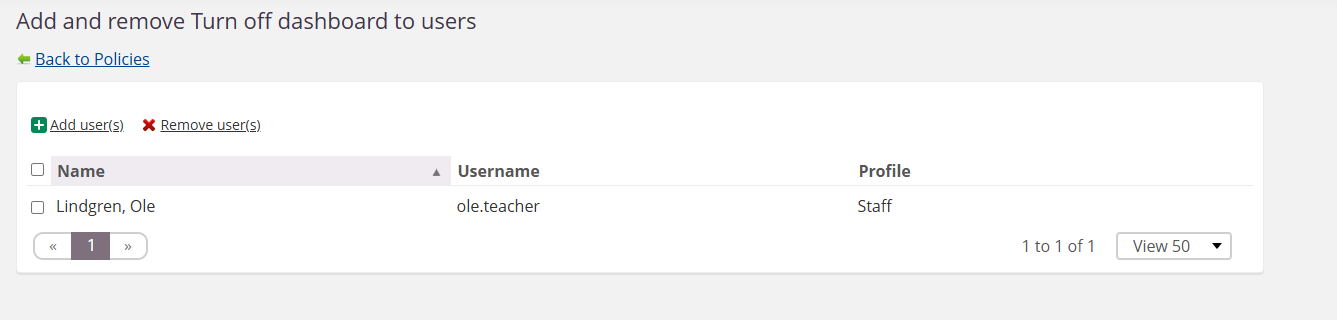
5.3 Removing a Policy
5.3.1 Deleting a user from the policy
- Go to the policy overview page
- Click the number where the amount of users with the policy is indicated
- Tick the checkbox next to the user name
- Click Remove user(s)
- The user is removed immediately. There is no confirmation dialog.

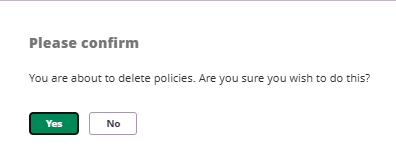
5.3.2 Deleting the policy
- Select the policy or policies to delete
- Click Delete policy
- Click OK
6 Settings & Customisation
6.1 Policy scope by organisation
- Local administrators can only manage policies for their own organisation.
- Site-level policies created by system administrators override local policies.
- Separate policies must be created for each organisation on a site.
6.2 How profiles and hierarchy affect policy access
Policy access is determined by two factors working together: the user's profile at a given hierarchy level, and their role in the organisational hierarchy. Both must align for a user to see, create, or change a policy.
A user who has been granted administrative rights through a role (e.g. a teacher with admin rights) does not gain the same policy access as a user with an Administrator profile at that level. The profile determines policy authority, not admin rights alone.
"You can override only those administration settings that have been enabled for your current profile."
This means:
- A system administrator at site level can create and manage policies for the entire site.
- A user with an Administrator profile at a specific hierarchy level can manage policies for that level and its child organisations.
- A user with a Teacher profile who has been granted admin rights at a lower hierarchy level can only create policies for the organisations where they are admin, but only for settings that are otherwise enabled for their profile type. That will usually be very limited.
Why this matters in practice
School administrators typically have an Administrator profile at their school level, but a Teacher profile (or similar) at the site level. This is intentional — assigning an Administrator profile at site level would grant access to the entire hierarchy.
As a result, a school administrator:
- Can create and manage policies for their school.
- Cannot see policies set at site level by the system administrator.
- Cannot override settings that have been disabled by a higher-level policy.
6.3 Policy inheritance and override behaviour
Policies follow a top-down inheritance model through the hierarchy:
- A policy set at a higher level (e.g. site) takes precedence over policies at lower levels (e.g. school).
- If a higher-level policy disables a setting, a lower-level policy cannot re-enable it — even if the lower-level administrator creates a policy that attempts to do so.
- Lower-level administrators cannot see higher-level policies that affect their users.
Note! Because of earlier use cases of overly restrictive policies set on system administrator profiles, some policy settings can not be set for these users.
7 Technical Information
- Changes apply immediately after saving.
- Policies can be combined; conflicts are resolved by highest security level.
8 Troubleshooting
Cannot create a policy
Symptoms: Option to add policy is missing.
Cause: Missing Policy management permission.
Solution: Ask the system administrator to grant permission via profile or policy.
Policy does not override settings
Symptoms: Changes have no effect after saving the policy.
Cause: Override checkbox not selected.
Solution: Tick Override and select Allowed or Not allowed for each setting.
Policy settings not visible
Symptoms: An administrator cannot see certain policy settings, or an entire policy created at a higher level is not visible.
Cause: The user's profile at the relevant hierarchy level does not have sufficient access. This commonly occurs when a user has a Teacher profile at site level but an Administrator profile at school level. Policy visibility is determined by the profile at the level where the policy was created, not by admin rights granted through roles.
Solution:
- Verify the user's profile at the hierarchy level where the policy was created.
- If the policy was created at site level, only users with an Administrator or System administrator profile at site level can view and manage it.
- If a school administrator needs to manage settings that are controlled by a site-level policy, contact the system administrator.
Lower-level policy does not re-enable a disabled setting
Symptoms: An administrator creates a policy to allow a feature, but it remains disabled for users.
Cause: A higher-level policy (e.g. site-level) has already disabled the setting. Lower-level policies cannot override restrictions set at a higher level in the hierarchy.
Solution:
- Contact the system administrator to check whether a site-level policy restricts the setting.
- The setting can only be re-enabled by modifying or removing the higher-level policy.
More Help Resources
Have more questions? Please start by asking your school administrator.
Product release notes
Stay updated with the latest itslearning releases: https://itslearning.com/product-updates
Service status
Check the current status of itslearning services: https://status.itslearning.com/
Ideas portal
Share your ideas and help shape the future of itslearning: https://ideas.itslearning.com/
Roadmap
Check out the itslearning roadmap: https://itslearning.com/global/roadmap/